Flower Power
- Click on the green background to put a flower there
- Use the slider to change the size of the flowers
- Click on a flower icon to add different flowers
- You can also type in a different flower name to add different flowers
|
|
In this third lesson you will focus on harnessing the power of
Lingo, Director's scripting language. As you go through these steps,
you will use an incremental development process to create an
interactive movie similar to the one on the left. The advantage of
incremental development is that you have a functioning application at
the conclusion of each step. You'll find it's very gratifying to see
your hard work paying off! It's also important to see that each
change makes the application work the way that you want it to. With
incremental development, if something goes wrong, it's relatively
easy to figure out what needs fixing. Be sure to save your work as
a different version at the conclusion of each step!
Lingo - An
Overview
Before we begin, let's take a closer look at Lingo. Lingo is a
powerful scripting language that enables you to control -- with great
precision -- exactly what happens on-screen when certain events
occur. Lingo is also relatively easy to learn. Even if you've never
written a computer program before, you can become proficient with
Lingo in a short period of time. If you're an experienced computer
programmer, you'll find that you can use Lingo to do just about
anything you could do with another programming language.
Handlers and Events
In the previous two lessons you saw how Director plays a movie
that has no Lingo scripting in it. You also learned to change the way
a movie plays by writing scripts. Hopefully you noticed that each
time you wrote a script, you inserted a Lingo statement -- i.e.
instructions to Director -- between a top line that begins with the
word "on" (such as "on exitFrame") and a bottom
line that reads "end". This block of code, starting with
"on" and ending with "end", is known as a
handler.
Each handler corresponds to some event. When that event
occurs, all of the statements in the corresponding handler are
executed in sequential order*. Events may be triggered by the user
doing something (like clicking the mouse button) or they may occur
naturally as part of playing the movie (like going from frame to
frame). You, the programmer, can also define your own events ... but
that's best left to another lesson. Below is a list of some
pre-defined events in Director.
|
|
Playing a Movie
startMovie
stopMovie
enterFrame
exitFrame
|
Triggered by User
keyDown
mouseDown
mouseUp
idle
|
* It's important to remember that Director will always do
precisely what it is told to do, in the order that it is told
to do it in. Whenever one of my scripts doesn't work the way I want
it to, the first thing I do is pretend to be the computer and follow
each of the steps. I uncover a lot of programming "bugs" this
way.
Different Types of Scripts
In addition to handling a lot of different kinds of events, Lingo
allows you to relate an event to some object in the movie. So, for
example, you could have a bunch of buttons on the stage, and
something different happens when you click each one. (In fact, you
did this in the previous lesson.)
A script may be associated with a sprite, a cast member, a frame
in the movie, or the entire movie. Whenever a pre-defined event
occurs, Director takes the following steps:
- If the cursor is over a sprite, and there is a handler for the
event associated with that sprite, then that handler is
executed.
- Otherwise, if the cursor is over a sprite, and there is a
handler for the event associated with the cast member for that
sprite, then that handler is executed.
- Otherwise, if there is a handler for the event associated with
the current frame, then that handler is executed.
- Otherwise, if there is a handler for the event in a movie
script, then that handler is executed.
- Otherwise, the event is ignored.
Using the Script Window
Before you start writing a lot of Lingo scripts, it's good to
become familiar with the script window.
- A blinking cursor shows the current position in the script. If
you type anything, or paste in some text (using Edit -> Paste
in the menu bar), the text will appear where the cursor is. The
box directly above the script area shows what handler the current
position is in; if it isn't in any handler, you will see
"[global]".
- If you highlight some text and then start typing, whatever you
type will replace the highlighted text.
- The button with "i" in a blue circle is used to change the
type of the script. A movie script is automatically associated
with the movie you are working on; a score script may be
explicitly linked to either a frame or a sprite.
- The button marked with "L" brings up an alphabetized list of
Lingo statements. Hold down the mouse button as you scroll through
the list, and then release the mouse button when you find the
command that you want. The command will then be inserted where the
cursor is (or the text is highlighted) in your script. This is a
great way to ensure your script has the correct syntax!
- The button next to the "L" brings up a categorized list of
Lingo statements. It works the same way as the "L" button; the
only difference is how the statements are organized in the
list.
- The button with two dashes in it ("--") will add two dashes to
your script. In Lingo, anything that appears on a line after two
dashes is considered a comment. A comment is text that is
there simply to remind you, the programmer, of what you're doing;
it is ignored by Director when the handler is executed. Use this
button to temporarily disable one or more lines of code in your
handler.
- The button next to this un-comments text in the script.
It's important to note that Director doesn't necessarily know about
your scripts until you do one of two things:
- Close the Script window, or
- Select Control -> Recompile All Scripts from the
menu bar.
When you do this (I recommend the latter), Director will check for
syntax errors (i.e. determine whether or not it knows how to
follow the instructions you have given it). If there are syntax
errors, a pop-up window will give you the choice of ignoring the
errors (not a good idea) or going to the place in the script that is
causing the error. It's then up to you to debug your
program.
Debugging With the Message Window
As with all programming languages (and, in fact, all languages of
any kind), Lingo has its own syntax and semantics.
Semantics are concerned with the meaning of statements in the
language. Syntax is concerned with rules of how these statements are
structured. If you've never programmed a computer before, you may be
surprised to learn how stupid the computer really is. If the
statements in your program don't follow the syntactic rules
exactly, the computer won't know what to do, and so it will
give up. The semantics are equally precise: the computer will only do
exactly what it is told to do, in the order it is told to do it
in.
Each Lingo statement appears on a separate line; when the line
ends, the statement ends. Whenever a handler is invoked, Director
interprets and executes the statements line by line. Director also
provides a message window (select Window -> Message from
the menu bar) where you can type in Lingo commands. When you press
the Enter key, Director interprets and executes that statement. This
is a good way to test Lingo statements (to see what they do). It's
also a good way to check the values and types of variables.
Programming Capabilities
If you are a programmer, you may be interested to know the
following about Lingo:
- Lingo supports a variety of decision and control statements,
including loops and conditional branching.
- Lingo is weakly typed, with variables taking on the type of
whatever they are assigned. So, a variable x can contain a string
in one part of the program, and an integer later on (although this
is not recommended). A variable that hasn't been assigned a value
is void by default.
- Variables may contain simple values -- such as integers,
reals, booleans, or strings -- or more complex data -- including
arrays and objects. Lingo provides functions for discovering the
type of a variable, and for changing the type of the variable
(e.g. integer to real).
- Lingo supports both linear arrays and associative arrays. The
elements of an array need not all be of the same type.
- Variables may be local (by default) or global (if declared) in
their scope.
- Director also maintains a set of system variables which you
cannot set, but can refer to. All of these begin with the keyword
"the". Some examples are
- the frame = the number of the frame that is
currently displayed on Stage
- the mouseLoc = the current location of the mouse
pointer on Stage, measured in pixels from the left and top
edges of the Stage
- the clickOn = the number of the sprite that was
most recently clicked on
- Lingo is not case sensitive. In fact, even strings aren't case
sensitive: in Lingo, "STOP" is equivalent to "stop".
Getting
Started
It's time to start your 3rd movie! These steps should seem pretty
familiar by now. If you forget how to do any of them, go back and
review Lesson 1.
- Launch Director and start a new movie (select File ->
New from the menu bar).
- Using the Paint window (and/or the File -> Import
option), create 3 small bitmapped cast members representing 3
different things (I chose to make 3 different flowers). Be sure to
give each cast member a descriptive name.
- Using the Tool Palette window, create a filled rectangle that
covers most of the stage.

- Click on the filled rectangle icon (in the left column of
the Tool Palette)
- Select a foreground color. Actually, this will be a
background against which you will place the other cast members.
I chose green for mine. Choose yours appropriately.
- Click on the Stage near the upper-left corner, then drag
down and to the right (still holding down the mouse button)
until the rectangle covers most of the stage. Release the mouse
button.
- Position one of your other cast members off-Stage.
- Select a cast member, and drag it onto the stage.
- With that sprite still selected (it appears outlined on the
Stage), set the Ink to Matte (selected at the top of the Score
window).
- Now select Modify -> Sprite -> Properties from
the menu bar.
- Set the Left part of the Location to the negative Width of
your sprite. For example, if the Width (Size) is 100, set Left
to -100.
- Set the Top part of the Location to the negative Height of
your sprite.
- Click on OK to save these changes.
- Make the movie loop endlessly on the first frame
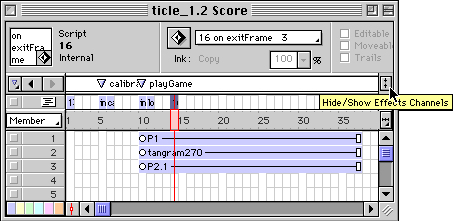
- Open up the Score window. You should see that the rectangle
is in sprite channel 1, and the off-stage cast member is in
sprite channel 2.
- Double-click on the script channel in frame 1.
- Type "go to the frame" in the script window. Your script
should look like this:
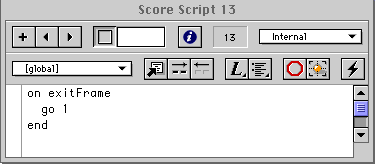
on exitFrame
go to the frame
end
This tells Director to re-enter the current frame (the frame)
after it exits the frame.
Puppets - Controlling
Sprites
In the previous two lessons you used the Score to control the
sprites on stage. In this step, you'll learn how to control sprites
with scripts.
Establishing Control
As you've seen in the past two lessons, the Score typically
controls sprites on the stage: where they appear, what cast member
they are associated with, etc. You can also use Lingo to control a
sprite. But what if the Lingo commands and the Score contradict one
another? Director takes care of this with the puppetSprite
command:
puppetSprite 1, TRUE -- properties of sprite 1 will be
controlled by Lingo
puppetSprite 1, FALSE -- properties of sprite 1 will be
controlled the Score
By default, the Score controls the sprites. Any Lingo commands
regarding the sprites are ignored. But from the time you make a
sprite a puppet, Lingo controls that sprite; anything further in that
sprite channel of the Score will be ignored. If you find that a
sprite isn't doing what you expect it to do, check to see whether it
is a puppet or not.
You are now going to make sprite 2 (where you have your off-stage
sprite) a puppet.
- Create a new Movie script.
- Open the Script window
- Click on the "+" button (in the upper-left corner of the
window) to create a new script
- Click on the information ("i") button near the top of the
window. If Type is not Movie, click on the arrow and select
Movie.
- Create a handler for the startMovie event that makes sprite 2
a puppet. To do this, type the following in the current script
window:
on startMovie
puppetSprite 2, TRUE
end
- Create a handler for the stopMovie event that returns control
of sprite 2 to the Score. To do this, type the following after the
startmovie handler in the current script window:
on stopMovie
puppetSprite 2, FALSE
end
Setting Sprite Properties
Now that Lingo has control of the sprite, what can you do with it?
Lots of things! All are achieved by setting the sprite
properties. Basically, you set a sprite property using the
following syntax:
set the <property> of sprite <number> to
<value>
where <property> is some property of the sprite,
<number> is the number of a sprite that you have
previously made a puppet, and <value> is an
appropriate value. If you select the Categorized lingo button (on the
Script or Message window) and scroll down to Sprites, you will find a
list (two, actually) of sprite properties that you can set with
Lingo.
The first property that you will set is the trails
property. By default, the trails property is off: as you move a
sprite on the Stage, you see the sprite in its new location only,
with no indication of where it was before. When the trails property
is on, the moving sprite leaves a trail, or after-image, in every
place it has appeared previously. Set the trails property of sprite 2
in the startMovie handler (that you just created) so that the handler
now looks like this:
on startMovie
puppetSprite 2, TRUE
set the trails of sprite 2 to TRUE
end
Linking Sprite Location to the Mouse Location
In addition to setting sprite properties to explicit values, you
can have them take on other values that are stored in Director's
variables. One of these variables is the mouseLoc, which
stores the current location of the mouse pointer on the Stage.
At the end of this step you will have a movie that will place a
copy of your picture (the cast member associated with sprite 2)
everywhere you click (as long as it's within the rectangle on Stage).
Be sure to save your movie (as "version1") and try it out. Part of
the fun of developing movies in Director is testing them!
- Create a new Score script.
- Open the Script window
- Click on the "+" button (in the upper-left corner of the
window) to create a new script
- Click on the information ("i") button near the top of the
window. If Type is not Score (or Behavior in Director 7), click
on the arrow and select Score (or Behavior).
- In this new script, write a handler corresponding to the
mouseDown event that sets the location of sprite 2 to the location
of the mouse pointer.
- Type the following in the Script window:
on mouseDown
set the loc of sprite 2 to the
mouseLoc
end
- Take note of the (cast member) number of the script, and
then close the Script window
- Link this new script to sprite 1 (the background
rectangle)
- Open the Score window
- Select sprite 2 in the Score
- Near the top of the Score window, near the Inks, there is a
blank box with a small triangle in the lower-right corner.
Click on that triangle, and then scroll down to select a script
to link to the current sprite.
- When the correct script is selected, release the mouse
button. The number and initial text of that script should
appear in the box that was previously blank.
- Save and play your movie.
Buttons
You've seen in past lessons how to use buttons to control
navigation. Now you'll learn how to use them to control sprites.
Different Kinds of Buttons
In Lesson 2 you
created buttons using the Button tool in the Tool Palette. But
really, anything that appears on Stage can be a button ... as long as
you write the Lingo handlers indicating what happens when someone
clicks on the button. Earlier on, you created three pictures (cast
members). These will now become icons (buttons) in a menu.
- Create a rectangular menu area at the bottom of the Stage.
- Open the Tool Palette window
- Click on the filled rectangle icon
- Select a foreground color. Actually, this will be a
background on which you will place your buttons. I chose black
for mine. Choose yours appropriately.
- Click on the Stage near the lower-right corner, then drag
up and to the left (still holding down the mouse button) until
the rectangle an appropriately sized region at the bottom of
the stage. Release the mouse button.
- Place copies of your 3 pictures over this menu area. These
will be your custom buttons.
- Open the Cast window.
- Drag each of the 3 pictures from the Cast window onto the
Stage.
- Resize each of the custom buttons so they fit nicely within
the menu area. You can resize a button by
- dragging the handles (small boxes along the outline
around the sprite on Stage) until the button is the right
size, or
- selecting Modify -> Sprite -> Properties
from the menu bar, and setting the Width and Height
explicitly.
General Purpose Sprite Scripts
You will now write the Lingo code that will change the thing (cast
member) that gets copied to the stage when you click on it ... just
like you can in my movie. You could do this by
writing a separate script for each button. Instead, I'm going to show
you how to write one general-purpose script that you can share among
several sprites. When you have finished, be sure to save your movie
(as "version2") and try it out.
- Write a script that will change the cast member associated
with sprite 2.
- Link this script to each of the custom buttons in the menu
area.
- Open the Score window.
- Find the sprites corresponding to the 3 buttons you placed
at the bottom of the Stage, and highlight them.
- At the top of the Score window, find the script
window that shows what script is associated with the
highlighted sprite(s). Click on the arrow in the lower-right
corner of this window and scroll down until you find
PickPicture.
- Save and play your movie.
Text
Lingo supports a fair amount of text processing. You can use Lingo
to write messages, notes, whatever, as needed, on the stage. You can
also use Lingo to capture whatever the user types, then parse and
process it. All of this is done with fields.
Fields
A field is a cast member that contains text. Unlike a text cast
member, you can use Lingo to change the text in that cast member. You
can also make the cast member editable, which means that the
user can change the text in that cast member. In this part of the
exercise, you will create a field that shows the name of the cast
member currently being used by sprite 2.
- Create a new field
- Open up the Tools Palette window.
- Select the Field button in the Palette window.
- Set the foreground (text) and background colors for the
field.
- Click on the Stage, and then type "Cast" in the new
field.
- If you want, you can highlight the word "Cast" in the field
and change the color, font, size, and style.
- Name the field "tag"
- Open the Cast window.
- Find the new field cast member you just created, and click
on it once to select it.
- Near the top of the Cast window, type the word "tag".
- Position the new field next to the set of buttons in your menu
area.
Writing Text
You currently have a field that always says the same thing. Now
you will modify it to reflect what cast member is associated with
sprite 2. To do this, you must put text into
field.
- Initialize "tag" with the appropriate label in your startMovie
handler.
- In the Cast window, double-click on the cast member that
contains the startMovie handler. The Script window should
appear with the correct script in it.
- Just below the line where you make sprite 2 a puppet, add
the following lines of code:
set i = the memberNum of sprite 2
put the name of member i into field "tag"
- Modify your "PickPicture" script such that the text in "tag"
changes when the cast member changes.
- Back in the Cast window, double-click on the PickPicture
cast member, or use the arrow buttons in the Script window to
advance to the correct script.
- After the last line of the mouseUp handler, just
above the end line, type the following line:
put the name of member i into field "tag"
- Close the Script window, then save and run your movie.
Remember to save your movie as a new version!
Reading Text
Now you will make modifications allowing the user to type in a
label and have that change the cast member. To do this, you
will create a custom handler, set a keyDownScript, and use a global
variable to ekkp trck of whether the label needs updating.You will
also have to check the label to make sure that it is the valid name
of a cast member.
- Make the "tag" field editable.
- Make the cast member editable.
- Open the Cast window.
- Click once on "tag" to select it.
- Click on the "i" button near the top of the Cast window.
A pop-up window labeled "Field Cast Member Properties"
should appear.
- Under Options, check the box marked Editable.
- Close the pop-up window.
- Alternatively, make the sprite editable.
- Open the Score window.
- Click once on the "tag" sprite (i.e. the one that places
the "tag" field on the Stage) to select it.
- Click on the Editable button to make the sprite
Editable
- Write a custom handler that changes the cast member associated
with sprite 2 when the user types in a new name and then presses
the RETURN key.
- Create a new Movie script.
- Create a handler called enterKey by typing the following in
the Script window:
on enterKey
end enterKey
- This handler shouldn't do anything until the RETURN key is
pressed. Inside the handler (i.e. between the 1st and last
lines), add an if statement to check the last key that
was pressed:
if the key = RETURN then
end if
- Create a global variable that will keep track of whether
the RETURN key was pressed.
- Declare a global variable called in the 1st line of the
handler:
global updateName
- Set the value of the global variable to TRUE inside the
if statement:
set updateName = TRUE
- Also within the if statement, get the member
number corresponding to the member name typed in the "tag"
field:
set name = field "tag"
set i = the number of member name
- If the "tag" field contains a valid member name, then
change the member associated with sprite 2.
- After the line where you set i, add an
if statement to see if the member number is valid.
(Any value greater than 0 will be valid.):
if i > 0 then
end if
- Inside this if statement, change the cast member
associated with sprite 2:
set the memberNum of sprite 2 to
i
- Move sprite 2 off-Stage:
set the loc of sprite 2 to point(-100, -100)
The finished handler should look like this:
on enterKey
global updateName
if the key = RETURN then
set updateName =
TRUE
set name = field
"tag"
set i = the number
of member name
if i > 0
then
set
the memberNum of sprite 2 to i
set
the loc of sprite 2 to point(-100, -100)
end if
end if
end enterKey
- Now that you've created your handler, ensure that it always
gets called first by making it the keyDownScript
- In the Script window, find the Movie script that
contains the startMovie handler.
- Within that handler (i.e. after the first line but before
the last line), set the keyDownScript with the following
line:
set the keyDownScript to "enterKey"
- Make sure your "tag" always contains the correct name by
updating it (if needed) every time the frame changes.
- In the Script window, find the Score script that
contains the exitFrame handler.
- Add the following first lines to the handler, to update
"tag" if the name has been updated
global updateName
if updateName then
set i = the memberNum of sprite 2
set name = the name of member i
put name into field "tag"
end if
- Reset the global variable updateName so it doesn't keep
updating:
set updateName = FALSE
- Save your movie, then test it. See what happens when you do
the following:
- Place the cursor at the end of tag and press
RETURN.
- Place the cursor in the middle of the end of tag and
press RETURN.
- Highlight the entire label, type in the name of another
cast member and press RETURN.
- Highlight the entire label, type in gibberish, and press
RETURN.
- Highlight the entire label, and press RETURN.
Enhancing
Interactivity
You now have the basic skills for building all sorts of
interactivity into your applications. You will finish up your
application by introducing a custom cursor, and a slider for setting
the size of the sprite.
Cursors
The cursor is a graphic symbol that tracks the mouse location
on-screen*. By default, the cursor looks like an arrow. We can also
change the cursor to reflect capabilities, or to show that the cursor
is over a special area, as I did in my movie above. You will now
learn to create your own custom cursor.
* Some would claim that this is really the mouse pointer, not the
cursor. But in Director, they're the same.
- Draw your own custom cursor in the Paint window. Your cursor
MUST be black and white, and 16x16 pixels in dimension.
- In the Paint window, click on the "+" symbol to create a
new bitmap.
- Change your bitmap to black & white:
- Select Modify -> Transform Bitmap from the
menu bar.
- In the pop-up window, change the Color Depth to 1
Bit.
- Zoom out as much as possible
- Select View -> Zoom -> 800% from the menu
bar, or
- Click on the magnifying glass, then click inside the
window until the scale no longer changes.
- Set the rulers so that they show the indivual pixels.
- Choose View -> Rulers from the menu bar.
- Very carefully outline a square area 16 pixels x 16 pixels
in dimension.
- Draw your icon within this square area.
- Type a name for your new cursor (call it "cursor") in the
appropriate area near the top of the Paint window.
- Associate this new cursor with the background (sprite 1),
indicating that clicking over it will copy a picture there.
- Open the Script window and find the startMovie handler
- Inside this handler, type the following lines:
set i = the number of member "cursor"
set the cursor of sprite 1 to [i, i]
- Save and play your movie. The cursor should change when you
move it over the background!
Sliders - Moveable Sprites and Constraints
Sliders are an intuitive input device that allows a user to change
a numeric value simply by shifting an indicator along a bar. In this
case, you will use the position of the indicator to determine a
height and width for sprite 2 (i.e. the sprite that
stamps pictures on the background). The key thing to notice is that
the user can move the indicator (i.e. it is moveable), but
only within the allowed constraint.
- Create the graphic elements for your slider. These include
- a small indicator that contrasts well against the lower
menu bar,
- a brightly colored thin rectangle to slide the indicator
along, and
- another thin rectangle -- only 1 pixel high, but the same
length as the previous rectangle -- which is the same color as
the menu bar (background).
- Position the graphic elements on the menu bar, adding them in
the order opposite that indicated above (i.e. the indicator goes
on top). Although you don't have to use the sprite channels
I've suggested here, be aware that you must refer to the
correct sprite channels in the instructions later on.
- Put the thinnest rectangle in sprite channel 20. You should
not be able to see this rectangle.
- Put the other thin rectangle in sprite channel 21.
- Put the indicator in sprite channel 22.
- Add instructions to the startMovie handler to setup the
slider.
- Align the sprites that you just placed on stage. The
horizontal position of the indicator should reflect the
original size of sprite 2 (the picture that gets stamped onto
the stage).
set the loc of sprite 20 to the loc of sprite 21 -- align the 2 rectangles
set the locv of sprite 22 to the locv of sprite 20 -- vertical alignment of indicator
set the loch of sprite 22 to (the left of sprite 20) + (the width of sprite 2) -- horizontal alignment
- Make the indicator moveable, but constrain it to the
one-pixel-high bar.
set the constraint of sprite 22 to 20
set the moveableSprite of sprite 22 to true
- Also add (in the startMovie handler) statements that define a
global variable ratio that allows you to retain the
correct aspect ratio for your pictures as you scale them up and
down.
- Define the global variable in the top line of the movie
script
global ratio
- Set its value inside the startMovie handler
set ratio = float(the height of sprite 2) / float(the width
of sprite 2)
- Write a cast or score script -- associated with the indicator
-- that sets the height and width for sprite 2
when the mouse button is released (on mouseUp).
- Declare ratio again, at the top of the script, so
that you can use it here.
global ratio
- Use the indicator position to set the width
set w = (the loch of sprite 22) - (the left of sprite
20)
set the width of sprite 2 to w
- Multiply by the global variable to set the height
set the height of sprite 2 to (w * ratio)
- Move the sprite off-screen
set the loc of sprite 2 to point(-100, -100)
- Save and play your movie. See what happens as you change the
slider. Adjust the size of the slider (using Modify ->
Sprite -> Properties) to get the appropriate scaling
range.