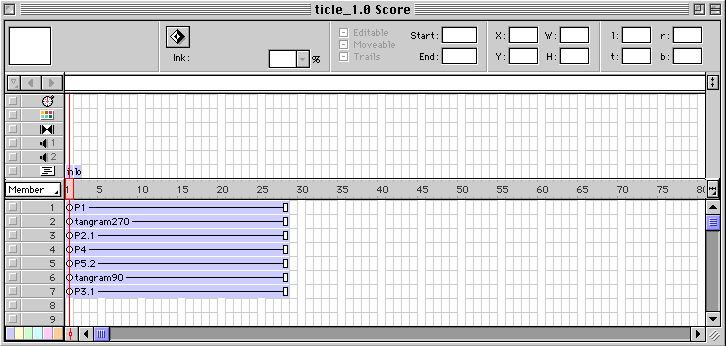
Your second assigment is to create an animation using Macromedia
Director, like the one shown on the left. Notice that you can click
on buttons to change the animation rate, and what's being animated.
At this point I assume you've gone through the first
lesson.
Macromedia Director was initially designed to be a simple 2D
animation tool, and it still serves that purpose well. Animations are
good for showing changes over time, transitions and transformations
of elements, and relationships among objects.
Animation
Principles
If you've ever looked at a filmstrip, you know that the "moving
pictures" we see in the theaters and on television are really just
sequences of still pictures seen in rapid succession. Because the
changes are relatively small, going from one picture to the next, we
perceive motion. This is essentially how we create animations with
Director: by changing the arrangement on the stage ever so slightly
from one frame to the next.
Cell Animation
The very first filmed animations were drawn -- and filmed -- frame
by frame. This meant that an artist had to draw thousands of pictures
even for a short film. Consequently, drawings in the earliest
cartoons are generally not very sophisticated.
Cell animation, invented in the early part of the 20th century,
made it possible to create the beautifully drawn feature-length
animations that the Disney studios are famous for. With cell
animation, a scene is separated into layers: characters and props are
painted onto clear acetate cells, which are laid over background
paintings on an animation stand. A single background painting may
appear for several seconds in a scene, with simple camera motions
(zoom and pan) changing the view. Then only the characters need to be
redrawn from one frame to the next. Further savings may be achieved
by having multiple cells for the characters and props, separating the
parts that change rapidly from those that don't. Cells may even be
reused, with sequences (e.g., a "walk" sequence) appearing over
different backgrounds.
Although cell animation reduces the amount of drawing that must be
done, it also complicates the filming process in that each frame is
now an arrangement of pictures. To minimize the confusion that might
arise, a timing sheet keeps track of what's on the animation stand,
how the camer moves, and the corresponding audio.
Director extends the ideas behind cell animation, allowing you to
place up to 128 sprites (cells) on the stage (animation stand) at a
time. It also provides a timing sheet (the Score) which allows you to
specify what appears in each frame of your animation.
Key Frames and Inbetweening
Some animators are able to just draw a sequence of pictures and
have the resulting motion look the way they want it too. More often,
an animator will first draw the frames showing key points in the
action (key frames) and then draw the frames that make the transition
from one key frame to the next (inbetweens). In large productions,
the more senior animators draw the key frames, and then have others
draw the inbetweens.
Director can do some of this inbetweening for you. If your key
frames show an object in different positions, or at different sizes,
Director can fill in all of the inbetween stages.
Constraints of Computer Animation with Director
Despite the great flexibility that computer animation gives us,
the medium does impose some constraints. With Director, this is
largely because raster images are used.* Being aware of these
constraints will help you to plan better animations.
- Going from one frame to the next requires that Director update
the part of the screen that changes. The larger the area of change
is, the longer this will take. To achieve rapid frame rates, and
more compact files, minimize the area of change.
- When you zoom in on a raster image, each pixel in the image is
mapped to several pixels on the screen: your picture starts to
look like it's made up of little boxes. When you zoom out, only
some of the image pixels get mapped to the display; details (like
thin lines) can be lost.
- When you rotate a raster image, it goes out of alignment with
the raster screen. Each pixel in the display may then map to
several pixels in the images; choosing just one creates
distortions in the image. You will see this if you rotate an image
in the Paint window. Director does not support rotation on the
Stage.
- Director does not know about the shapes in a raster image, and
so it cannot produce inbetween images (showing, for example,
incremental changes in a drawing or 3D view). The only way to
"morph" from one image to another is with the blend option
(discussed in this lesson).
* Like your computer display, a raster image is a fine grid that
stores exactly one pure color for each grid square (pixel) in the
picture. The computer displays a raster image by mapping image pixels
to display pixels; that is, the color of a pixel on the screen
corresponds to the color of one of the pixels in the image. A raster
image contains no information about the object(s) that the picture
represents.
Zooming and
Panning
Let's begin by zooming in on, and then panning across, one of the
pictures from your slide show. Start by following these steps. Don't
forget to give this new version of your slide show a new name!
- Open your slide show in Director by selecting File -> Open
from the menu bar.
- Delete all frames from the movie.
- Click on a cell in sprite channel 1 after the last
frame in the Score, and hold down the mouse button.
- Drag the mouse down and to the left until all sprites that
you specified in the movie are highlighted. Release the mouse
button.
- Select Edit -> Cut from the menu bar (or hit the
Backspace or Delete key on your keyboard).
- Change the timing to 15 frames per second.
- Double-click on the timing channel in frame 1.
- Using the slider or the arrows, change the frame rate to 15
fps.
- Click on OK.
- Save this new movie with a new name.
- Select File -> Save As from the menu bar.
- Type a new name for this movie.
- Click on OK.
Zooming
Select one image in your cast to work with, preferably one with
lots of detail.
- Drag your cast member onto the stage, and adjust its
position.
- In the Score, drag the right edge of the sprite (channel 1) to
frame 45. Your movie will take 3 seconds to zoom in on this
picture (3 seconds x 15 fps = 45 frames).
- Click on the rightmost cell of the sprite in channel 1,
highlighting that cell only.
- Zoom in on your picture.
- Select Modify -> Sprite -> Properties from the menu
bar.
- Change the scale (size on the stage) of the image by
setting a percentage. (100% is the current size; 200% is twice
as big).
- Alternatively, set the scale by entering the number of
pixels (height or width) that you want your picture to
span.
- Play your movie. Director has automatically filled in all of
the inbetweens!
Panning
When you zoomed in on your picture, you may have noticed that a
line with dots on it appeared over your picture on the stage. This
represents the inbetween stages along an animation path. You
will see how to adjust this as you pan across your picture. By the
end of this sequence, you should have moved some focal point to the
center of the screen.
- Adjust the position of the picture in the last frame in the
zoom sequence.
- Copy that last frame to the frame next to it, creating a pan
sequence 2 seconds long.
- With the last frame only highlighted, select Edit
-> Copy from the menu bar to copy it.
- Click on the cell in the empty frame next to the end of the
zoom sequence (frame 46, sprite channel 1).
- Paste a copy of the last frame here by selecting Edit ->
Paste from the menu bar.
- Extend the right edge of this new sequence to frame 75. If
this sequence fills only one frame, do the following:
- Select the one frame sequence (click and release the
mouse button).
- Holding down the Shift key, select frame 75 (click and
release). Your one-frame sequence should still be
highlighted, and frame 75 will appear on the stage.
- Select Modify -> Extend Sprite from the menu bar.
Your sequence should automatically extend to frame 75.
- Adjust the position in the last frame of the pan sequence.
- Click on the last frame of the pan sequence in channel 1,
selecting that one cell.
- On stage, click on the picture you wish to move, and drag
it to its new location. You will notice a line with dots appear
over your picture. This represents your animation path.
- Adjust intermediate positions along the path.
- Select a single cell in the pan sequence (in channel 1 in
the Score). You should notice that one of the dots in the line
changes color. This represents the intermediate position for
that frame.
- Click on the highlighted dot on the path (on the Stage),
hold down the mouse button, and drag that dot to a new
position. The path should now appear to be curved, with the
current frame at an extreme position on that curve.
- Play your movie.
Morphing
With morphing, something on the stage "transforms" to something
else. You've probably seen slick examples of this on television
commercials. Here, you will achieve a crude version of this effect
with blending.
- Make a copy of the last frame in your pan sequence, and paste
it into the Score to create a one second morph sequence.
- Click on the cell in frame 75, sprite channel 1, and select
Edit -> Copy from the menu bar.
- Click on the adjacent cell (frame 76, sprite channel 1) and
select Edit -> Paste from the menu bar.
- Extend the right edge of this new sequence to frame 90, as
described above.
- Create a new object to "morph" to, which will emerge from the
focal point of your image (currently center-stage).
- Place the new object on Stage, on top of the image*, for the
entire morph sequence.
- Click on the (empty) cell in frame 76, sprite channel 2, to
highlight it.
- Drag your new cast member from the Cast window onto the
Stage.
- Adjust the position and size of this object on Stage.
- Click on the center of the image to drag it to a new
position.
- Click on one of the handles (little boxes) on the
bounding rectangle (around your sprite) and drag that to
change the scale of your sprite.
- Use a Blend to make this sprite gradually appear.
- Click once on the sprite (in channel 2 of the Score) to
highlight the entire 1 second morph sequence for that
sprite.
- From the Ink category (found at the top of the Score),
select Blend.
- Select the first cell where this object appears (frame 76,
sprite channel 2), and change the % to 10%. This means that in
this frame, the picture that you see will be 10% the new
object, and 90% the background behind.
- Select the last cell where this object appears (frame 90,
sprite channel 2), and make sure the % is 100%. This means that
in this frame, the new object will be fully opaque.
- If you like, repeat the previous step (in reverse) to make the
background image disappear.
* Cast members in higher-numbered sprite channels appear on top of
(overlay) the cast members in lower-numbered sprite channels.
Moving Objects
In the previous step you've already seen how to move objects. In
this step you'll refine this skill by animating a bouncing ball. You
may either create a new movie or tack this onto the end of what
you've already created. This, by the way, is a first assignment given
to all animators.
Basic Motion
- In the Paint window, create a ball.
- Select a foreground color.
- Select the filled ellipse tool.
- Hold down the Shift key, then click and drag to create your
circle. Holding the Shift key creates a circle (instead of an
ellipse).
- Place the ball on the Stage, such that the left edge of the
ball touches the left edge of the Stage, near the top. Make this
sequence 1 second long.
- In the Score, change the Ink to Matte, so you no longer see
the rectangualar boundary around the ball.
- Select the entire one-second sequence for this sprite.
- Up near the top of the Score, you will see the word Copy in
a box, with a down-pointing arrow next to it. Click on the
arrow, then drag down until Matte is selected.
- Adjust the path of the ball to make it bounce.
- Click on the last (15th) frame of the sequence in the
Score, and then move the ball (on Stage) so that it touches the
right edge of the Stage, near the top. Holding the Shift key as
you move the ball will allow you to move the ball straight
across the stage.
- Click on the middle (8th) frame of the sequence in the
Score. On the Stage, drag the highlighted spot (representing
that position) straight down until the ball touches the bottom
edge of the Stage (hold the Shift key to move it straight
down).
- Select Modify -> Sprite -> Tweening from the menu
bar.
- Change Curvature to Linear by moving the slider all the way
to the left.
Acceleration and Deceleration
If you play the animation sequence you just created, you'll see
that the ball moves ... but it doesn't look like it's bouncing. Thing
that are falling naturally accelerate; thing that bounce (or are
thrown) up are working againt gravity, and gradually decelerate until
they start to fall again. Animators achieve this effect with
techniques that they call "ease in" (accelerate) and "ease out"
(deccelerate).
- With the 8th frame selected, select Modify -> Split Sprite
from the menu bar to split the sequence in two.
- Have the firt half of the animation ease in:
- Select the entire first half of the sequence, and then
choose Modify -> Sprite -> Tweening from the menu
bar.
- Near the bottom of the pop-up menu you'll see the words
Ease In. Use the associated slider to select a rate of
50%.
- While you're at it, set the Curvature back to Normal.
- Have the second half of the animation ease out:
- Select the entire second half of the sequence, and then
choose Modify -> Sprite -> Tweening from the menu
bar.
- Near the bottom of the pop-up menu you'll see the words
Ease Out. Use the associated slider to select a rate of
50%.
- While you're at it, set the Curvature back to Normal.
- Adjust the paths of both halves so that they curve ever
so slightly. This will make the animation appear even more
natural. Try it!
Squash and Stretch
When an object hits an obstacle with some force, it tends to
flatten slightly. Conversely, as an object accelerates, we see a
blurred after-image that makes the object look extended or stretched.
Animators traditionally use a technique called Squash and Stretch to
emphasize (and exaggerate) these phenomena, producing more realistic
animations. Although the shape of an object changes as it squashes
and stretches, it always retains the same volume.
- Click on the 9th frame of the sequence, and then choose Modify
-> Split Sprite from the menu bar.
- In the 8th frame, squash the ball slightly. Remember to try to
make it the same volume!
- Click on the sprite in the 8th frame (in the Score).
- On the Stage, click on the top-center handle (small box on
the box bounding the sprite) and drag it downward to slightly
squash the ball. Use the two center-side handles to increase
its width, so the ball appears to have the same volume.
- If you prefer, select Modify -> Sprite -> Preferences
from the menu bar. De-select (by clicking on) the box where it
says Maintain Proportions, then adjust the Width and Height
values. Click on OK when you're done.
- In the 7th frame, stretch the ball slightly.
- In the 9th frame, stretch the ball slightly.
Reversing the Sequence
Your animation should look pretty realistic at this point! Now the
only trouble is that it only moves left to right. In this step,
you'll make it bounce back and forth endlessly. Notice that your
bouncing ball is now represented by 3 sprites: a) when the ball is
falling, b) when the ball hits the ground, and c) when the ball
bounces back up. I'll be refering to these sprites as a, b, and
c.
- Copy sprite c to the end of the bounce sequence
- Select sprite c in the Score, such that all 7 frames of it
are highlighted
- Select Edit -> Copy from the menu bar to copy it
- Still in the Score, click on the cell immediately after the
end of the current sequence (the 16th frame after the ball
begins to bounce)
- Select Edit -> Paste from the menu bar to paste the copy
there
- Select Modify -> Reverse Sequence to reverse the sequence
(note: all 7 frames of the copy of sprite c should still be
highlighted when you do this).
- Remove the 1st frame of the reversed sprite, so the ball
remain against the right edge of the Stage for only one frame.
- Click once on the 16th frame, so that only that frame is
selected
- Select Insert -> Remove Frame from the menu bar.
- Copy sprite b to the end of the bounce sequence (the 22nd
frame).
- Copy sprite a to the end of the bounce sequence (the 23rd
frame).
- Select Modify -> Reverse Sequence to reverse the
sequence.
- Remove the last frame of the reversed sprite, where the ball
hits the left edge of the Stage.
- Click once on the 16th frame, so that only that frame is
selected
- Select Insert -> Remove Frame from the menu bar.
Markings and Loops
If you were to make a Shockwave movie from what you have right
now, the ball would bounce once and then the movie would end. Let's
make the ball bounce endlessly.
- Mark the beginning of the bounce sequence.
- Just above all the channels in the Score you will see a
blank area. Click inside that area, just above the first frame
of the bounce sequence.
- A small triangle will appear, with a blinking cursor next
to it. This is your marker. Type a label for your marker, e.g.
"start bounce" (but don't put the quotes in the label).
- At the end of the bounce, have the movie jump back to the
beginning of the bounce, indicated by the marker you just added.
- In the Score, double-click on the last frame of the bounce
sequence (the 29th frame) in the script channel. A script
window should appear, with a blinking cursor on the second line
of the script. (The first line should say "on exitframe").
- Type the following to jump to the named frame:
go to frame "start bounce" -- jump to the frame with marker
labeled "start bounce"
- As an alternative, you could jump to the closest (preceding
or current) marker using the statement
go loop -- loop back to the current frame (if marked) or
most recent marker
-- or --
go previous -- jump to the closest marker in an earlier
frame
- Close the Script window.
Character
Animation
Now that you've done a little bit of animating, you probably have
lots of ideas about other animations you'd like to create. Perhaps
you'll want to change the orientation of your object, or even rotate
it in 3D. Or maybe you'd like to have a character walk onstage and
wave.
The good news is that you can achieve these effects using
Director. The bad news is that you will have to draw (or digitize)
each new position of the object to do it.
Drawing the Character Positions
Each position of your character must be stored as a separate cast
member. There are several ways you can generate all these cast
members. Use one of these techniques to generate 7 stages of an
animation sequence.
- Draw all the positions yourself. Although this option gives
you the greatest control over your final results, it is also the
most time consuming. If you choose this option, take a look at
some traditional animation books, such as Tony White's Animation
Workbook. You may also want to look at Edweard Muybridge's motion
studies.
- Use another animation program to generate the images. This
could be a vector animation package, such as Flash, or a 3D
animation program, such as 3D Studio. Be sure to create these
animations against a flat background so that you can integrate
them with your Director backgrounds.
- Copy the cast members from some other source. If you like, you
can download the images I created for my sample movie:


Placing the Character on the Stage
Now that you have your animation sequence stored in the Cast, you
need to place those images on the Stage. This can be non-trivial,
especially if you're trying to make the figure move across the Stage.
Try these tricks, and see if they don't help you.
- In the Paint window, use the Registration Point tool to mark a
part of your character that will remain in the same location (for
at least some of the animation) relative to the ground. For
example, if your character is supposed to walk across the stage,
place the registration point on the big toe of the foot on the
ground.
- Place each cast member (for this animation) on stage, near the
center, such that each one is visible for one second. You may do
this by ...
- Dragging each cast member from the Cast to a cell in the
Score. Adjust the length of the sprite so that it appears
onstage for only 1 frame.
- Dragging the first cast member in the sequence onto the
Stage. Then you need to
- Stretch out the sprite so that it covers the total
number of frames in the sequence (7 frames if you're using
my cat).
- For each of those frames,
- click on the sprite in the Score (at that frame
number)
- select Modify -> Split Sprite from the menu
bar
- click on the cast member (in the Cast) that should
appear in that frame
- select Edit -> Exchange Cast Members from the menu
bar
- Adjust the positions of these sprites relative to one another
so that the character moves an appropriate amount from one frame
to the next. Here are some tricks to help you do this:
- Enable the Trails feature for the sequence of sprites. Then
as you play the movie (or step through frame-by-frame using the
Control Panel), you will see all the places that the character
has been, and you can adjust their positions accordingly.
- In the Score, select all of the sprites in the sequence
by clicking on the 1st one, holding down the Shift key, and
then clicking on the last one.
- Click on the box marked Trails (at the top of the Score)
to enable this feature for the selected sprites.
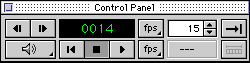
- Use the upper-left icons in the Control Panel to step
forward or backward one frame at a time.
- Use a small shape as a marker to indicate where the
character is from one frame to the next.

- Open up the Tool Palette window by selecting Window
-> Tool Palette from the menu bar.
- Click once on the filled circle icon.
- Set the foreground color in the Tool Palette window.
Make it a color that contrasts well against the background
and your animated character.
- With the first frame of your this animation sequence
selected, click on the stage where you want the circle to
appear. Choose a point that will help you to adjust the
position of the sprite in the next frame. For example, place
it over a foot on the ground.
- Step to the next frame, and adjust the position of your
character accordingly. Then pick up the spot and move it to
a new position (if necessary). Repeat for the other frames
in the sequence.
- Move the animation sequence to an appropriate starting
location on the Stage. For example, in my movie, the cat runs in
from off-stage to the right.
- In the Score, select all of the sprites in the sequence by
clicking on the last one, holding down the Shift key,
and then clicking on the first one. This way, the first
frame of the sequence will be visible on Stage.
- On the Stage, drag the character to the desired starting
position. All of the other sprites will be moved relative to
this one.
- Copy, paste, and adjust the location of the animation
sequence, so that your character moves from one side of the stage
to the other.
- With all of the sprites in the animation sequence still
selected, choose Edit -> Copy from the menu bar.
- Click once on the frame just after the sequence ends, in
the sprite channel where the sequence appears.
- Choose Edit -> Paste from the menu bar to paste a copy
of the sequence there.
- Select this newly added sequence as you did before,
starting at the end. Be sure to only select those sprites in
the new part of the sequence(i.e. the ones that need to be
repositioned on the Stage).
- On stage, drag the character to the appropriate new
position. Use one of the tricks listed above to help determine
what this position should be.
- Repeat until you have your character moving all the way
across the stage.
Makings the Animation Loop
You now need to make this animation sequence loop endlessly, just
as you did for the bouncing ball sequence.
- Mark the beginning of the animated character sequence.
- In the blank area above the channels in the Score, click on
the first frame of the animated character sequence.
- When the marker appears, type a label for your marker, e.g.
"start character" (but don't put the quotes in the label).
- At the end of the animated character sequence, have the movie
jump back to the beginning of the sequence. This is indicated by
the marker you just added.
- In the Score, double-click on the last frame of the
animated character sequence in the script channel. A script
window should appear, with a blinking cursor on the second line
of the script. (The first line should say "on exitframe").
- Type the following to jump to the named frame:
go to frame "start character" -- jump to the frame with
marker labeled "start character"
- As an alternative, you could re-use your script to jump to
the closest (preceding or current) marker by doing the
following:
- In the Score, click only once on the last frame
of the animated character sequence in the script channel.
- In the upper left corner of the Score you will see a
blank area with a small triangular arrow next to it. Click
on the arrow, and a pop-up menu will appear. Drag the mouse
downward until the script you wrote earler is selected.
- Release the mouse button. The cell in the script channel
will be filled to indicate that the script was
selected.
Navigation: Switching
Between the Animations
You now have two animation sequences in your movie. If you start
the movie at the beginning (or middle) of one animation sequence,
that one will play over and over again. If you start with the other
animation sequence, then that is the only one you will see. Try
it!
In this step, you will add buttons for selecting the animation
sequence to view, and an animation rate to see them at.
Selecting an Animation Sequence
In my sample movie, you can switch from the bouncing ball to the
running cat by clicking on a button marked "Cat". Likewise, you can
switch from the running cat back to the bouncing ball by clicking on
a button marked "Ball". Here's how to create those buttons.
- Add a button marked "Cat" to the first frame of the bouncing
ball sequence.
- In the Score, click in an empty sprite channel in the first
frame of the bouncing ball sequence.
- Open up the Tool Palette window by selecting Window ->
Tool Palette from the menu bar.
- Click once on the Button icon.
- Set the background color (the color of the button) and the
foreground color (the color of the label) in the Tool Palette
window. You may want to review how you did this when you
created a title in lesson
1.
- Click on the Stage where the button should appear, then
drag the mouse (still holding down the mouse button) and
release when the button is the desired size. You may adjust the
position and size of the button later on.
- Type "Cat" (or some other appropriate label) on the button.
If you wish, you may adjust the text settings just as you did
when you created a title in
lesson 1.
- In the Score, extend the sprite such that it appears on
stage during the entire bouncing ball sequence.
- Write a script for that button, which will make cause the
running cat sequence to start playing.
- Open the Cast window by selecting Window -> Cast from
the menu bar.
- Find the button cast member that you just created, and
click on it once to select it.
- In the upper region of the Cast window you will see a
script icon (which looks just like the icon that marks the
script channel in the Score). Click on it. A script window
should appear, with a blinking cursor on the second line of the
script. (The first line should say "on mouseup").
- Type the following to jump to the beginning of the
character animation:
go to frame "start character" -- jump to the frame with
marker labeled "start character"
- Close the Script window.
- Add a button marked "Ball" to the first frame of the running
cat sequence (or whatever your character animation is).
- Write a script for that button, which will make cause the
bouncing ball sequence to start playing.
- Rewind your movie and play it. Try both buttons to ensure that
they work as advertised.
Changing the Animation Rate
Earlier on, you set the tempo for your movie in the Score using a
Tempo pop-up menu. You can also set the tempo in a Script!
- Create a button labeled "Slow" and place it on the Stage. In
the Score, extend this sprite so that the button is visible
throughout both animation sequences.
- Write a script for that button, which will set the tempo to a
relatively slow pace.
- Find the button cast member in the Cast window, and click
on it once to select it.
- Click on the script icon in the upper region of the Cast
window. A script window should appear, with a blinking cursor
on the second line of the script. (The first line should say
"on mouseup").
- Type the following to jump to play the movie at 5 frames
per second:
puppetTempo 5
- Close the Script window.
- Create a button labeled "Fast" and place it on the Stage near
the "Slow" button. In the Score, extend this sprite so that the
button is visible throughout both animation sequences.
- Write a script for that button, which will set the tempo to a
relatively fast pace. 30 frames per second is good.
Post On the Web
When you are satisfied with your movie, create a Shockwave movie
and post it on the web as you did in Lesson 1 (see Posting
on the Web if you forget how to do this). Then send
me email with the URL of the web page with your movie in it.
You did it!