Your first assigment is to create a simple slide show using
Macromedia Director, like the one shown on the left. Before you
start, make sure that you have the necessary tools as described in
the Introduction. Here are
some tips to help make your learning experience more meaningful.

- Save frequently, with multiple versions. When you first start
working on a movie, you should create a file for saving your work
by selecting Save As from the File pull-down menu (on the menu
bar, as shown above). Then, be sure to Save frequently (select
Save from the File menu, or click on the Disk icon). If your movie
is in a state that you're pretty happy with, but you want to keep
working on it, use Save As to create a new file (version) for the
new work you'll be doing. This way, you can return to the previous
state if you want to.
- Back up your work. At the end of the day, you should copy your
movie(s) to a floppy, Zip, or Jazz disk. That way, if something
happens to the files on your hard disk, you haven't lost all of
your work.
- If you're not sure how to do something, use the Help option
(from the menu bar). Director Help provides tutorials, examples,
and summaries of all the things you can do with Director. It also
provides an excellent index of all the Director terms and topics.
If you can't find what you're looking for here, try the Web Help,
which takes you to the Macromedia
web site.
- Remember that the purpose of this lesson is to learn Director,
not to create your ultimate masterpiece (although you might create
it anyway in the process). Don't be afraid to experiment - you
won't break your computer. And if you save frequently with
multiple versions, you won't lose your work either!
Gathering
Pictures
The first step is to assemble 5 to 10 pictures for your slide show
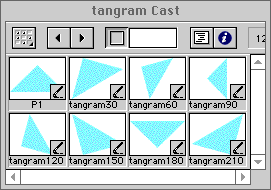
and make cast members of them (if you don't know what a cast member
is, go back and read about it in the Introduction!).
You may choose to use existing pictures - photographs, magazine
pictures, sketches, etc. - or create new pictures on the computer.
You can also have text titles. Try creating all three!
Create a Title
This is also useful for creating labels and captions for your
movie.

- Select the colors for your title
- Select Tool Palette from the Window pull-down menu, found
on the menu bar, to open the Tool Palette.
- Click on the front color chip to change the foreground
color. Drag the mouse until the color you want is highlighted,
then release the mouse button.
- Click on the back color chip to change the background
color.
- Type in your title
- Select the Text icon (a letter "A") from the Tool
Palette.
- Click once on the Stage, and type in your title.
- If you want to change any of the properties, select the
text by dragging the cursor over it, and make your selections
from the menus.
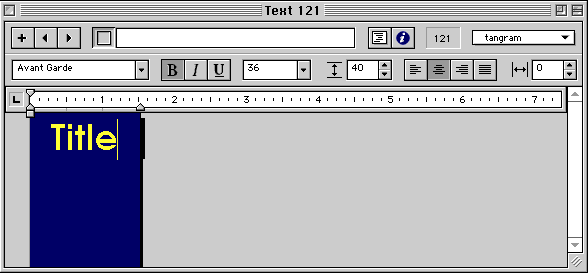
- Modify text properties
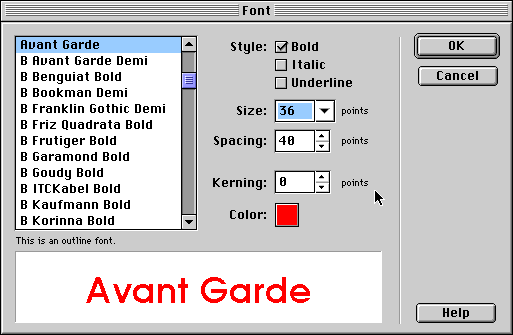
- Select Font from the Modify pull-down menu (on the menu
bar), or open the Text Window (also from the menu bar).
- Highlight the text that needs modifying.
- Select a Font, Size, and Style to your liking.
- Back on the stage, reposition the title as desired.
- Click on the image of the title on the stage (the sprite).
A dashed outline will appear around the sprite.
- Holding down the mouse button, drag the title to wherever
you want it on the stage. Release the mouse button to leave the
sprite in its new position.

Draw a Picture
Although other applications (like Photoshop) provide more options,
Director provides a reasonable Paint tool for creating (and touching
up) original artwork.

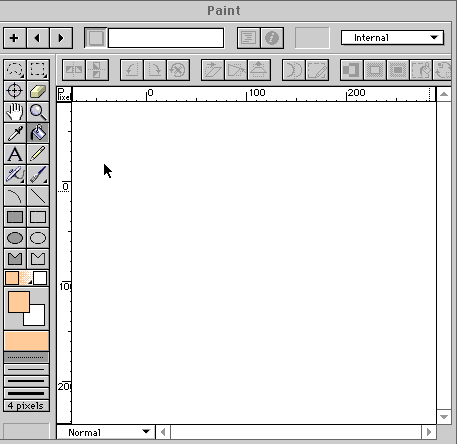
- Select Paint from the Window pull-down menu, to open the Paint
window.
- Click on the Foreground Color chip to change the color you'll
be working with. Notice that you can select a pre-defined color,
or define a new color.
- Select a drawing tool
- Pencil draws continuous thin lines
- Paint brush draws a series of paint spots. Notice that you
can choose from a variety of pre-defined brushes, or define
your own.
- Airbrush produces paint speckles, simulating spray paint.
Notice that you can change the size and range of the
speckles.
- Text ("A") allows you to type on your canvas. Notice that
in the Paint window, the text is painted onto the canvas; you
cannot go back and edit it as text.
- Open shapes you can choose from are line, curve, rectangle,
ellipse, and polygon. These give you outlines only. Notice that
you can select a line width at the bottom of the Paint tool
menu.
- Filled shapes you can choose from are rectangle, ellipse,
and polygon. These give you solid shapes filled in with a flat
color or (if you choose) a gradient (e.g. going from yellow to
red) or pattern (e.g. bricks).
- With your cursor over the canvas, start drawing!
- With the pencil, paint brush, or airbrush, hold down the
mouse button while you move the mouse. Releasing the mouse
button is like lifting the pencil/paintbrush off of the
page.
- With text, click on an area and start typing. As long as
the text area is outlined, you can still edit it as text; when
you click somewhere else, the text is "painted" onto the
canvas.
- For polygons, click (and release) the mouse button to
select the first corner. Notice that as you move the mouse, an
edge appears, extending from that first point to the current
cursor location. Click again to select the next point. The
polygon is complete when you close it by selecting the first
point again.
- For all other outlines and shapes, click on the starting
point and then hold down the mouse button as you position the
other defining point of the shape.
- If you make a mistake, you can correct it
- You can Undo the last thing you did (select Undo from the
Edit pull-down menu in the menu bar).
- The Eraser is like a square paintbrush that covers things
over with the background color.
- You can use a marquee tool (rectangular or irregular
"lasso") to outline an area, and then hit the Backspace
key.
- Press the "+" button (near the top of the Paint window) to
start a new picture
Digitize a Photograph
If you're in a hurry, you can download images
from the web and then jump to the third step.
- Bring your photograph(s) to the Faculty Development Lab, and
tell them that you want to digitize some pictures for this class.
- Digitize at full color, although you will be changing this
later on.
- Set the scale and dpi such that your picture will fit in a
window 200 pixels high x 300 pixels wide*.
- Save your pictures using the PICT format. Copy your files to
some portable medium (floppy, Zip, or Jazz) and carry them to the
machine you are using to create your Director movie.

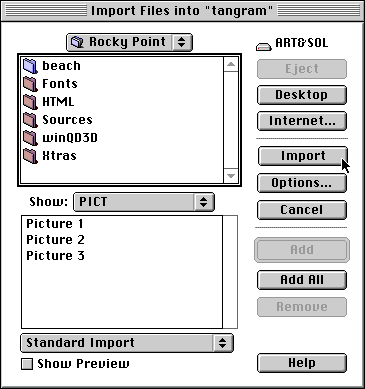
- In Director, Import your digitized photograph(s).
- Select Import from the File pull-down menu in the menu
bar.
- Use the top part of the pop-up menu to select the folder
that holds the pictures that you digitized.
- In the area labeled Type of Files, select PICT
- Click on the Add All button (or, if you only want one or
two PICT files, select the file name and click Add). The files
that you want to import should be listed in the area marked
Files (near the bottom of the pop-up menu).
- Click on the Import button.
* If 200x300 seems too small to you, feel free to make it bigger.
Just remember that larger movies take longer to load and display; and
that some people have monitors that are only 640x480.
Make Your Images 8-Bit
If you've spent much time "surfing the net", you've probably
learned firsthand how annoying it is to have to wait for large files
to download. One way to make files smaller is to use a limited color
palette. 8-bit color, using the Web palette, is a reasonable
compromise.
- Open up the Cast window.
- Select all of your cast members.
- Click on the first cast member. It will be
highlighted.
- While holding down the Shift key, click on the last cast
member. All cast members should now be highlighted.
- Transform the bitmaps.
- Select Transform Bitmap from the Modify pull-down menu (on
the menu bar).
- Choose 8 Bit Color Depth and the Web 216 Palette.
- Select to either Dither or Remap Colors. Dithering produces
the illusion of more colors by creating a visual mix, much like
the impressionist painters did. This is the best choice for
photographs and illustrations. Remap Colors keeps solid areas
of color solid. This is best for text and graphics.
Making a Movie
Now that you have your cast together, you can start to make a
movie!
Set Movie Properties
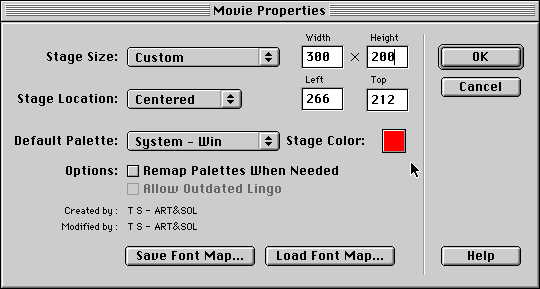
- From the Modify pull-down menu on the menu bar, choose Movie
-> Properties. A pop-up window will appear.

- Set the Stage Size to 300 pixels wide x 200 pixels high.
(Actually, it doesn't have to be this size, as long as you
choose something similarly small.)
- Set the Stage Color for your movie. This will be the
background color for every frame in your movie.
- Set the Default Palette to Web 216.
- Click on OK.
Set the Timing

- Open up the Score window.
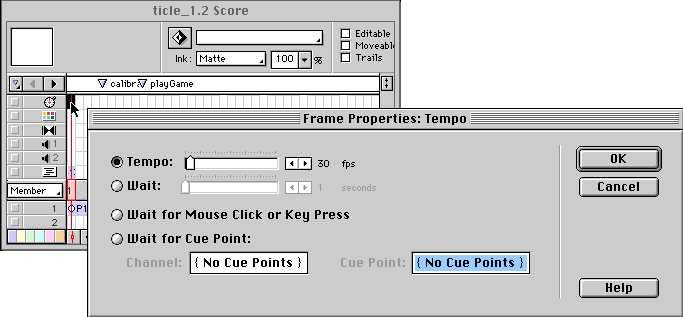
- Double-click on the first cell (in the column labeled
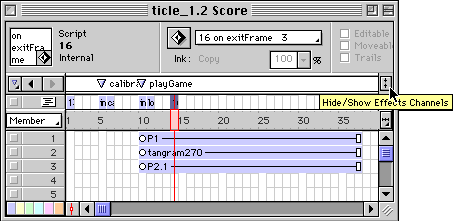
1) in the timing chanel (the row marked with a stopwatch).
If you don't see a row with a stopwatch, you may need to click on
the button with arrows in the right margin of the Score (Hide/Show
Effects Channels). A Tempo menu should appear.

- Set the timing to 1 fps (frames per second).
- Make sure Tempo is selected by clicking on the radio button
on the top row.
- Click on the slider next to the Tempo label, and drag it
all the way to the left while holding down the mouse button.
When the label to the right says "1 fps", release the mouse
button.
- Alternatively, you can repeatedly click on the left arrow
button (to the right of the slider) to change the value to "1
fps".
- Click on OK.
Add Frames to the Movie
Right now if you click on any cell in column 1 of the Score, you
should see your title on the stage. You should also see a shaded bar
in the 1st sprite channel (the row marked with a 1) of the
Score. If not, go back and create a
title.
- Open up the Cast window.

- Adjust the number of frames that your title will remain on the
stage.
- Click on the right edge of the shaded bar (marked with a
rectangle) in channel 1 of the Score and hold down the mouse
button.
- Drag the edge of that shaded bar to the last frame that you
want the title to appear in, then release the mouse button.
Remember, each frame will be visible for 1 second. So, if you
want your title to remain on screen for 3 seconds, make sure
the shaded bar spans the first 3 columns in the Score.
- Click once on the cell to the right of the shaded bar. This
is where the next image in your slide show will appear.
- Drag the next picture to appear in your slide show onto the
Stage.
- Click on the cast member in the Cast window.
- Holding down the mouse button, drag the cursor over to a
spot on the stage, then release the mouse button. A new shaded
bar should appear in the 1st sprite channel of the Score.
- If you wish, you may adjust the position of your picture by
clicking on the picture (on the stage) and dragging it to its
new location.
- Go back to step 2, and adjust the number of frames for the
latest picture on the stage. Continue on to step 3 to add the next
picture to your slide show. Repeat until all of the pictures are
in your slide show.
Make the Movie Loop
Normally, a movie plays by showing frames in succession: Director
"exits" the current frame, and then "enters" the next one in the time
sequence. When Director reaches the last frame of the movie (i.e. the
last column in the Score that has anything in it), the movie ends. To
make the movie loop (i.e. start at the beginning again after it
ends), you will need to write a script.

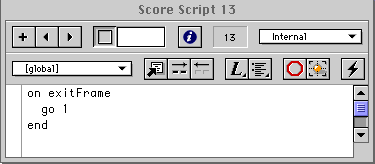
- In the script channel, double-click on the cell in the last
frame (column) in which something is on the stage. This should
open up a script window that contains three lines of text, with a
blinking cursor on the blank line in the middle:
on exitframe
end
Any instructions that you type between these first and last lines
will tell Director what to do when it exits the current
frame.
- If you don't see a blinking cursor on the middle line, click
there once to put the cursor there. Then type in the command:
go 1
- Close the script window.
Play Your Movie

At this point you should see what your movie looks like. You may
either:
- Click on the Play button in the Tool Bar or Controls window,
or
- Select Control-> Play from the menu bar.
To stop the movie, choose Stop (or click on the Stop button).
Adding
Transitions
If you think that the transition from one picture to the next is
too abrupt, you may want to incorporate transitions into your movie.
Repeat the following steps for each picture that you want a trasition
to. Or, if you prefer, you can create one transition and then drag
the resulting cast member (yes, a transition is a cast member, too!)
to the appropriate cells in the Score.

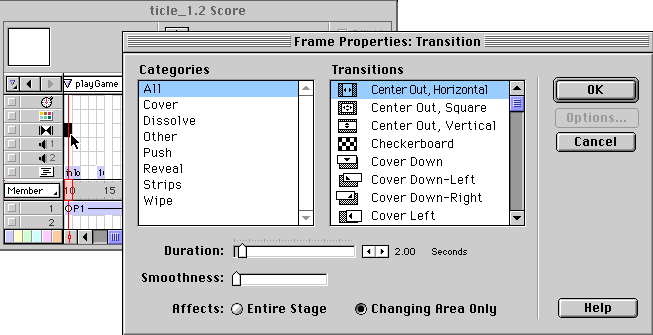
- Open up the Transitions window.
- Find the Transitions channel in the Score (the icon looks
sort of like a bow-tie).
- Double-click on the cell corresponding to the first frame
that your picure (that you want to transition to) appears
in.
- Select a Transition from the column on the right. You can
select a Category (from the column on the left) to change the list
of Transitions that you may choose from (in the column on the
right).
- Select properties of the transition.
- Select a duration. This is how long you want the transition
to take.
- Select a smoothness value. You should probably leave the
selection bar for this option all the way to the left (for the
smoothest transition). Less smooth transitions tend to look
jumpy.
- Click on OK to save your transition.
Adding a
Soundtrack
Sound often helps to "make" the multimedia experience. You may
have two sound files playing simultaneously in your Director
movie.
- Find an appropriate source. Director allows you to incorporate
sounds saved in either the .WAV format (for PCs) or .AIFF format
(for Macintosh). You can obtain these several ways. Contact either
Nick or myself if you need help with this.
- You will find that the World Wide Web is a marvelous source
of music and sound effects. When you find a file you like, just
be sure to save it to your local disk.
- A sound editing application (such as SoundEdit Pro on the
Macintosh) will enable you to capture, edit, and mix
soundtracks from an audio CD-ROM. Just be sure to save the
result in the proper format.
- You may also use a sound editing application to record your
own voice-overs or sound effects.
- Import a sound the same way that you import
an image. The only difference is that you select the Sound
category instead of PICT. Imported sounds will be added (where
else?) to your cast.
- Make It Play
Posting on the
Web
To view your movie on the web, you'll need to do the following.
When you have completed these steps, send
me email with the URL of the web page with your movie in it.
Create a Shockwave Movie
The movie that you've been working on is an editable Director
file: it's probably rather large, but you can always go back and make
changes to it (as long as you have a copy of Director on your
machine). Shockwave is a more compact format for the web, viewable in
the latest web browsers (or in older browsers with the plug-in
installed). The disadvantage of Shockwave is that these files are not
editable. Therefore you should save your movie in both formats.
- Save your movie by selecting Save As from the File option in
the menu bar. (Of course, you should have been saving all along!)
Call your movie slides.dir.
- Back in Windows (or the Finder on a Macintosh), create a new
folder for your Shockwave movies. Put a copy of your
Director movie in this folder. Then open that file in
Director.
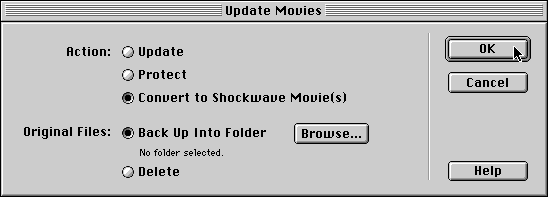
- Back in Director, select Xtras -> Update Movie from the
menu bar.

- Choose to Convert to Shockwave Movies, and Delete the original
files. It's OK -- remember, you have 2 copies of your movie.
- You will then be asked to select the movie to convert.
Double-click on your movie to convert it.
- When you choose to Update, your movie will be replaced with a
Shockwave movie called slides.dcr. Because
Director can't edit this movie, all information about your movie
(on the stage, in the cast, etc.) will seem to disapper. Quit
Director.
Create a Web Page
Using a text editor, create a web page that contains your
Shockwave movie.
- Copy the text from the following table and paste it into your
document.
<P>
<EMBED SRC="slides.dcr"
 PLUGINSPAGE="http://www.macromedia.com/shockwave/download"
 WIDTH=300 HEIGHT=200
 ALIGN=LEFT
 HSPACE=5 VSPACE=5>
</P>
|
- Edit this information as necessary.
- If you named your file something other than
slides.dir, be sure to change the name
indicated by SRC.
- If your movie is some size other than 300x200 pixels in
dimension, be sure to change the WIDTH and HEIGHT
appropriately.
- Because ALIGN=LEFT, your movie will be aligned with the
left margin. Anything following this (text, images, whatever)
will appear to the right of your Shockwave movie. If you want
your movie along the right margin with text to the left of it,
set ALIGN=RIGHT. If you want text to appear below your movie,
set ALIGN=BOTTOM.
- HSPACE and VSPACE creates a space between your movie and
the other elements in your web page. This space is measured in
pixels, both horizontally (HSPACE) and vertically (VSPACE). You
may adjust this spacing to suit your own taste.
- Save this web page as a file called slides.html
in the same folder that has slides.dcr on
it. If you like, you can go back and add whatever you want to this
web page using either a text editor or an HTML editor.
Post On the Web
Use FTP (file transfer protocol) to copy both slides.dcr
and slides.html to the account where you
keep your web pages. (Please see Nick if you're not sure how to do
this!) You now have a Shockwave movie on the web.
Congratulations!
![]()

![]()
