Here's a couple of good articles about the icon design process:
http://www.creativebloq.com/graphic-design/how-design-top-quality-icon-10135092
https://www.smashingmagazine.com/2016/05/easy-steps-to-better-logo-design/
Here's a handy icon size chart:
http://www.visualpharm.com/articles/icon_sizes.html
There are two desktop tools that can help you generate all the icon sizes you will need for Mac OS, iOS, Windows and Android
For Mac: https://www.kodlian.com/apps/icon-slate
For Windows: http://icofx.ro
To access the Adobe Kuler swatches in Photoshop CS6:
Windows > Extensions > Kuler
Windows > Swatches
Actions (arrow to the right of desired Kuler Swatch) > add to swatches panel
Use the square or circle template for the base grid
Use the path, shape, and type tools to develop your icons, creating separate layers for each shape, and layer groups for each icon
You can use symbol fonts, such as Webdings,
or the PS shape library to jumpstart your icon design
You can use Type > Convert to Shape to convert type glyphs to editable paths
You can use Layer > Combine Shapes to do boolean operations on selected layers to create a single compound path
Save the entire sheet of icons as a Photoshop file
Use guides to separate each icon into its own cell
Use the slice tool (part of the cropping toolset) to draw a cell for each icon snapping to the grid lines
Right click on each cell to edit each one by giving it a descriptive name
Use File > Save for Web to export each icon as a separate .png file, with All User Slices selected
You can also export your icons to Adobe Illustrator (to save them as .svg files) by selecting the layer(s) and choosing File > Export > Paths to Illustrator
Illustrator:
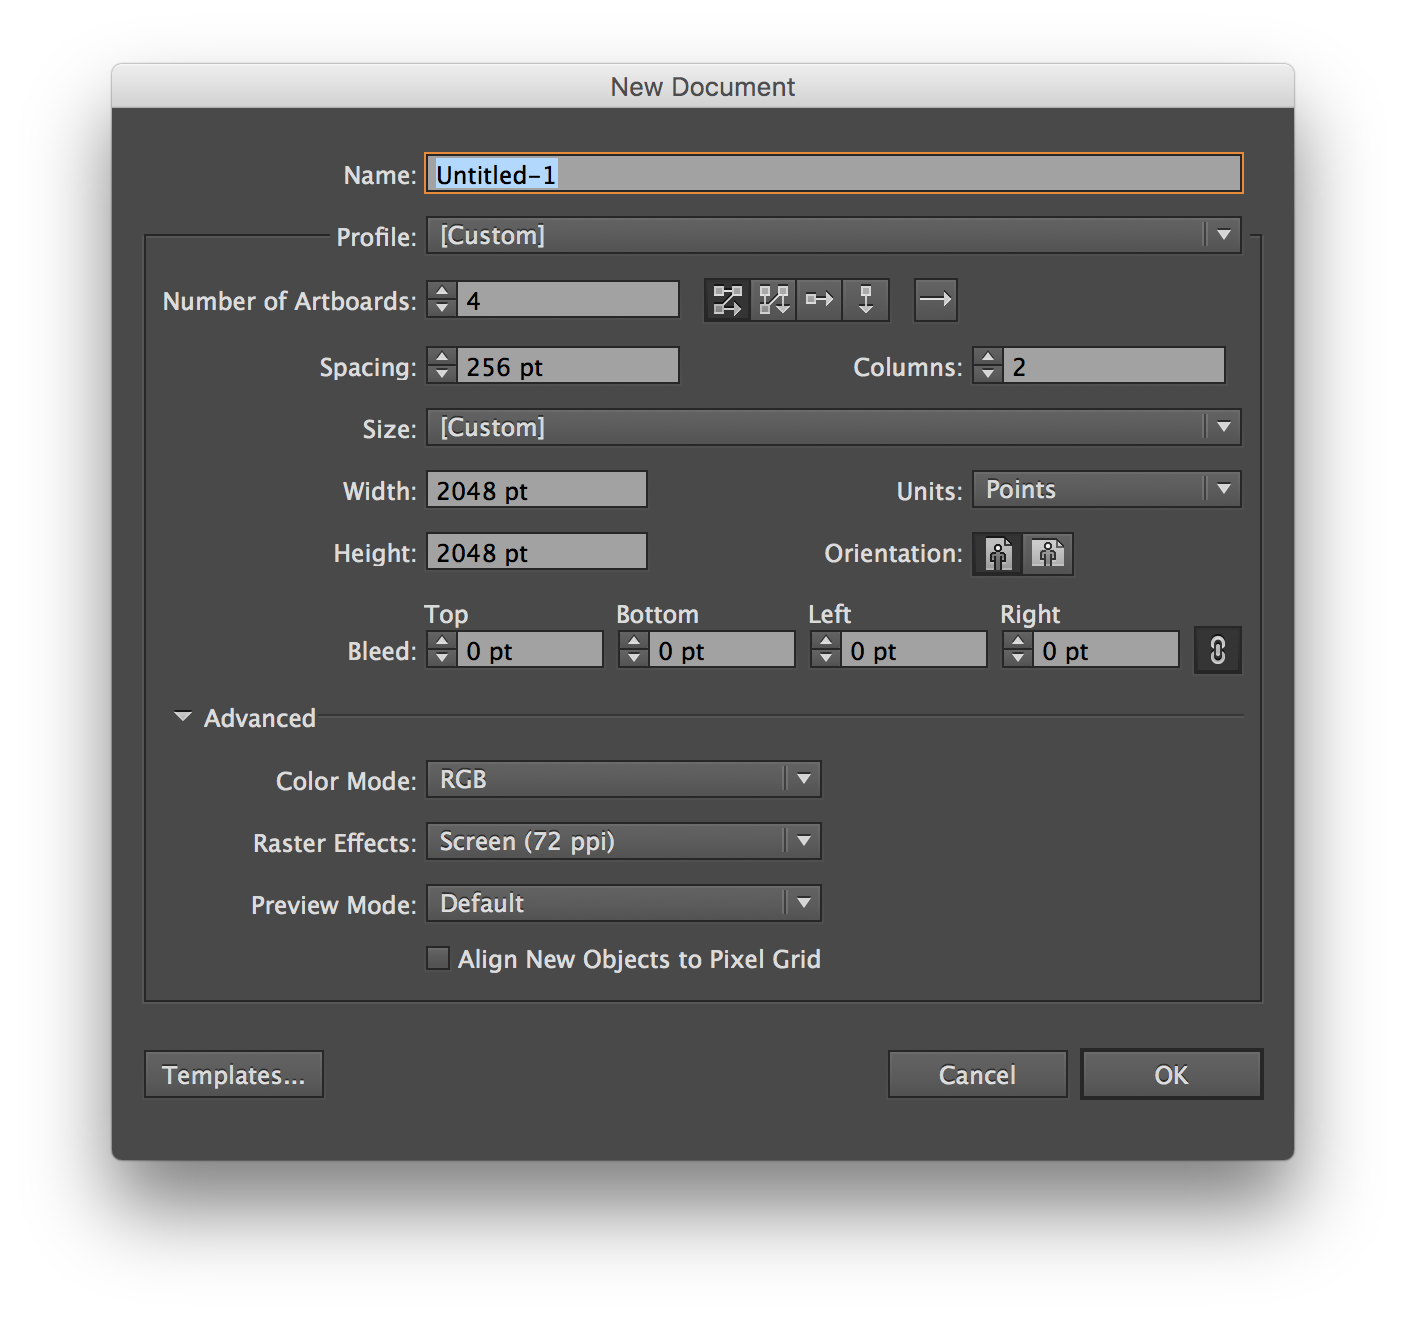
AI workspace - new file
Profile - basic RGB, units - points, number of artboards - 4, spacing - 256 points, columns 2, 2048 width and height
Preferences > guides and grid - gridline every 256 pt, 2 subdivisions, view > show grid
New layer, name it “guides”, snap to guides
Create new layers for each glyph (icon), sublayer for each icon
Windows > Extensions > Kuler
Open swatches panel
Actions > add to swatches panel
When drawing with the pen tool set stroke to black (or none) and fill to none (so you can see outline)
You can use symbol fonts, like Webdings, or the AI symbols library to jumpstart your icon design
Pathfinder - make compound paths - select shapes to either merge (unite) or punch out (minus front)
Object > compound path > make
You can also autotrace a bitmap to convert it to a compound path
Use File > Place to import the bitmap to a new artboard
Use Object > Image Trace > Make
Save the file in Abobe Illustrator format
Save the file again, but check the "Save each artboard as a separate file" option
Reopen each icon, and save each as .svg file
You can also save your icons as .png files, using File > Export > PNG
Icon Font:
Icomoon > launch app
Import icons - svg files
Select, remove, move, edit icons
Editor (can duplicate icon for major edits) move, scale, change base grid, download svg + replace
Download svg button bottom of page (plus png as fallback for web font)
Font button right next to it
Organized by grid size - make consistent using edit tool
Unicode-table.com (can map icon to existing unicode value, such as a heart) can search site for character
Icomoon maps to private use area of Unicode values (e000 and up)
Font preferences - name, class prefix & postfix, embed and encode in css, metadata (copyright), class selector (vs data attribute)
em square (multiple of 16 base grid), baseline (leave default)
Download .zip file
Span tag used to load icon in html file, need to include the generated css style sheet (and font directory) in your own site