Frame-by-Frame Animation:
Either by drawing in Flash itself, or by importing content from other applications,
like Fireworks or Freehand, you can create simple animations in sequential frames.
If the imported images are numbered correctly, Flash will automatically recognize
them as a sequence and create the keyframes for them, as in the example below.
Guide Layer: Spline-based Animation
In order to animate a loop of frames across the screen they need to be compressed
into a single object. In Flash this is called a Movie clip or a Graphic clip.
A Movie clip's timeline is independent of the Flash movie's main timeline, so
it will play whether the movie is paused or not. Movie clips can only be seen
animating in the exported .swf format. Graphic clips, on the other hand, can
be seen animating in the native .fla format, but will pause if the enclosing
movie is paused.
To make a clip you can select a range of frames in the main timeline and use the "Convert to Symbol" pull-down menu command. The symbol will appear in your library list. Or you can select "New Symbol" which will take you to the symbol's timeline, where you can import or draw your frames. It's advisable at this learning stage (which does not include working with Actionscript) to use Graphic clips exclusively.
Drag the symbol from the library list to the stage. Create an end keyframe in the same layer. Select the range of frames between them and select "motion tween" from the Frame panel. In the timeline a new type of layer can be created, called a guide layer. The guide layer is a vector path that the clip attaches to in the first and last keyframes, and which guides the motion of the clip across the stage. Attach the registration point of the clip in both keyframes to the guide, and press the RETURN key to see the animation. The option "orient to path" will rotate the clip in the direction it's traveling, as shown below.
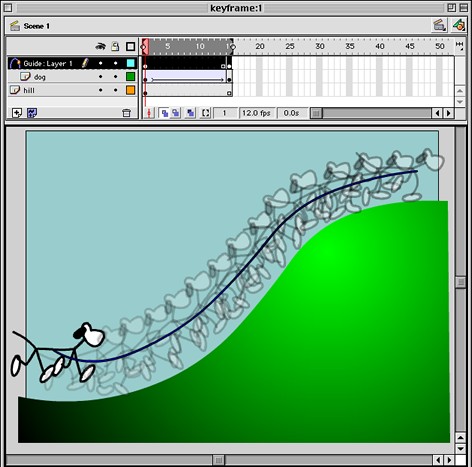
Click here to see the Keyframe.swf file.
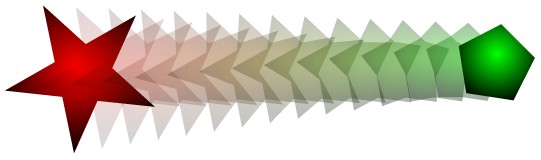
Shape Morph: Linear Interpolated Animation
Objects whose geometry is editable, such as geometric primitives, ungrouped
objects, and text which has been "broken apart", can morph from one
shape to another. These objects, when selected, show their outline as highlighted.
(Grouped and other objects - such as clips - show a blue bounding box when selected,
and are not editable in the main timeline). To create a shape morph, place one
object in the beginning keyframe and the other in the end keyframe of the same
layer. Select the frames between them and chose "shape" in the tween
options of the Frame panel. Their scale, fill, opacity, rotation, and screen
position can all be animated from one keyframe to the next, as shown below.
Adding Sound
Sound is imported into Flash in a raw, uncompressed format, such as AIFF on
a Mac. Files should probably be downsampled to 22kHz, 8-bit mono before importing,
although higher-resolution files are compressed and downsampled on export to
.swf. Editing capabilities are very limited in Flash, so all the mixing, attenuating,
editing and effects have to be done before import. Sound can be added to any
layer, but it is best to create a separate layer for each sound. Flash provides
an image of the sound waveform in the layer, which is useful for synchronizing
animations to the sound file. Flash by default will loop when downloaded, so
sound files should not exceed the duration of frames of the movie, or the sound
will still be playing when the movie loops and the sound is loaded again.
Mask Layer
The mask layer is similar to a traveling matte in video. It's an animated vector
shape that clips the layer below it, revealing only what is within the window
defined by the fill of the mask. A layer can be modified to be a mask layer
in the Modify > Layer pull-down menu. In the example below, the masked layer
is semi-transparent, so you can see through it to the layer beneath. This gives
the mask an "x-ray" effect.
