CSE 566 Virtual
Reality
Spring 2026
Prof. Arie
Kaufman
Assignment 1:
Basic VR
Credit: 14% of
final grade
Due date: Monday, February 16, 2026, 11:59 p.m. (Stony Brook
Time)
Overview
For this assignment, you will be designing a simple 3D scene of a subset of Stony Brook’s campus. Your virtual scene will have:
· a Character (Player)
· a building on simple terrain
· some vegetation (for example, trees)
· a bird that flies through the air
· a interactable hot air balloon
·
Day Mode/Night Mode
This
assignment should give you experience with the fundamentals of Unity and VR
development that you can build off of for future
projects.
Though we would love you to be creative with this first assignment, you may download models from the Unity Asset Store, or any other source, provided you have permission to download them and cite each source properly in your documentation. The exception to this is the building, which you must create yourself.
If you are excited and can’t wait longer to start getting your hands on designing your (first) VR project, then read ahead for details, otherwise watch this video and this video to spark some excitement.
Hardware
· Google Cardboard (or similar)
o Android 6.0+ or iOS 13.0+ (if using Google Cardboard)
Scene
Objects
As mentioned above, your assignment’s virtual scene should have:
- A GameObject serving as your Character – this will include whatever camera object you’re using (note: it should be first person view!), as well as scripts involving interactivity.
- One campus building – You will construct a basic replica of one named campus building from Stony Brook’s Campus Map.
The building exterior can be fairly basic, but it should approximate the shape of the building. However, length, width, and height must be (approximately) correct.
o For length and width, try using Google Maps or Google Earth Pro - “Measure Distance” (PROVIDED IN FEET, NOT METERS).
o For height, there are a number of approximation methods (Googling, using your thumb, etc.). Please give in your report reasoning as to why you chose this height.
o For measuring distance within Unity, try this addon.
The building cannot be floating in mid-air; it must look as if it’s “sitting” on grass.
Be sure to add colliders to the building, so the Player and the Balloon cannot travel through its walls or ceiling!
For the building interior:
- Basic floors, walls, and ceiling textures
o The interior layout does NOT need to match the true layout – you can have it be one big room.
- A light source placed inside that will shine during the Night Mode
- At least 2 large transparent glass windows that the light source can shine through during Night Mode
Please use the Assignment 1 spreadsheet to sign up for the building you would like to construct (one per person, first come first served).
Extra credit will be given for those who go above and beyond in their modeling – please write in your report how you did so.
|
|
|
|
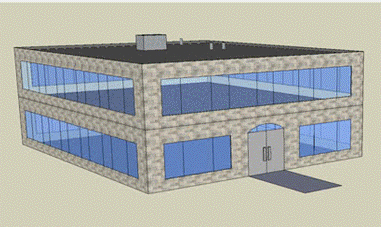
Fig 1. An example of a simple 3D
building
3. Vegetation - There should be at least 5 trees in your virtual scene. You may add other kinds of vegetation as well, for example grass patches, flowers, bushes, to make your tour scenic. The trees can be a downloaded model or a simple 3D tree designed using a 3D cylinder and cone or sphere (see Fig. 2).
|
|
|
|
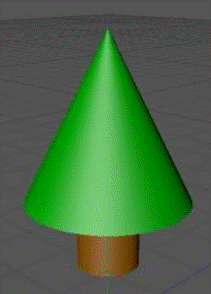
Fig 2. Simple 3D Tree
- A hot air balloon – You can either download a model from online, or create your own simple version (e.g., Figure 3).
The model must have:
o A balloon
o A basket
o Ropes or poles connecting the balloon to the basket
o A burner
o Two spot lights at either end of the bottom of the basket
During Night Mode,
the spotlights should shine down on the ground, and a point light underneath
the burner should turn on. These lights should have associated models (i.e.,
the light should not appear out of nowhere, but should
appear to come from the object).

Fig 3. Example of a Simple Hot
Air Balloon; this would be missing the spotlights and burner (presumably weight
bags are in the baskets).
- Bird – Can be downloaded or a simple 3D design (Fig. 4). The bird should be in the sky and have a constant continuous motion. You are free to design a path in a script for the bird’s motion, however, the path should demonstrate all quaternion rotations. Once the bird completes its path, it should restart its motion automatically from the starting point. You can choose any speed for its trajectory. The bird’s wings do not need to be animated.
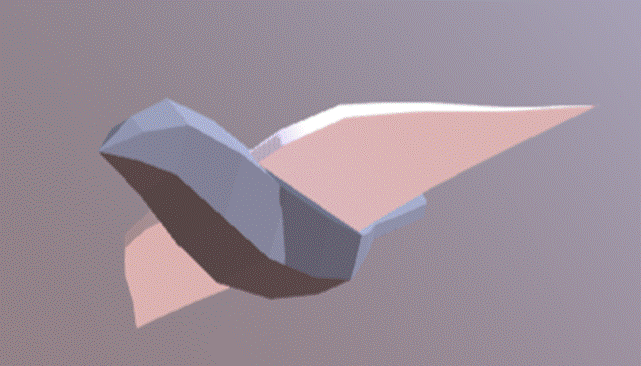
Fig 4. Example of a simple
bird. Source: https://sketchfab.com/3d-models/flying-bird-unity-21a70684bbe6441194f87fa46f5d653c
6.
A moon – this should be a
simple sphere which is placed appropriately enough to look like a moon, and illuminates the scene during Night Mode. You do
not need a “Sun” object.
Functionality/Scripting
Details
1.
Day Mode/Night Mode
During Night Mode, the sun should turn off, and the moon (a point light) should turn on; the light should be enough that the buildings and balloons are visible. Unlike the sun, your moon can be stationary. All the other lights (i.e., those in the building, the basket spotlights, and the burner light) should also turn on.
The day/night cycle should be scripted
by time; (e.g., after 30 seconds of day, it becomes night, and vice-versa).
2. Player Controls - The user can look around by rotating and moving their head. Since we are not using buttons or controllers in this assignment, the user will control the scene this way, using their “gaze” (i.e., where the center of the display is pointed) to select objects.
The scene should have two different
modes: Scene Mode (default), where the user is on the ground, out of the
balloon, and Tour-Ride Mode, where the user is in the balloon’s basket. The
user should be able to switch between these two modes using their gaze, but
ONLY when the balloon has landed somewhere. In VR terms, this instant change in
the user’s position is called teleportation,
which we will learn about later in this course.
In Scene Mode, the user can switch to Tour-Ride Mode by gazing at the balloon’s basket for at least 5 seconds.This can be implemented using Unity’s Raycasting functionality (for reference, see Gaze in Unity). To help the user interact, a very simple UI loading icon (text or image-based) should appear when staring at the basket, implicitly indicating that if they continue to do so, they will switch modes. If the user looks away, the loader should disappear and the timer reset. In Tour-Ride Mode, the user can gaze at the bottom of the basket for at least 5 seconds to switch back to Scene Mode; this should have a loading icon as well.
In Tour-Ride Mode, the user’s gaze also controls the balloon’s functionality. If they gaze at the burner, it should turn on (with a fire-like effect or model) and the balloon should begin to slowly rise to a plausible maximum height; if they gaze at it again, it should turn off and slowly descend. This, too, should have a loading icon. While in the air, the balloon lazily drifts in the horizontal direction that the user is looking.
3. Collisions - If the balloon collides with another object when moving – for example, a building or a tree – it should not go through it, but instead be blocked by the object. This means that “landing” on top of a tree or building is possible. The user should be able to get out of the basket on top of the building (if the roof is flat).
4. Bird Flight - The bird should be in the sky and have a constant continuous motion. You are free to design a path in a script for the bird’s motion, however, the path should demonstrate all quaternion rotations. Once the bird completes its path, it should restart its motion automatically from the starting point. You can choose any speed for its trajectory. The bird’s wings do not need to be animated.
Project
File Guidelines
Submit your entire project as a zip named “<your_name>_assignment1.zip”. Be sure to include the entire project directory containing Assets, Library, etc.
Some
other guidelines
Before starting this assignment, if you are not familiar with Unity and have not tried out Assignment 0, we strongly suggest that you go through Assignment 0 and complete it first. Additionally, check out the Unity Manual and see the Unity reference page on Input for a comprehensive overview of its functionality.
Before starting the assignment, think carefully about how you structure your scene’s object hierarchy. Begin by designing each object separately and test that your camera works fine. Then, put all the modes together in your virtual world and test out your teleportation and navigation.
Submission
It is strongly recommended that you test your application before submitting your work. Please save your Unity project in a folder named “CSE566 Assignments” in Google Drive and enable the share of this folder rather than sharing the single project file. In Brightspace submission, please submit the link to your Google Drive folder.
For this assignment, include the following for full credit: your Unity project folder, a report, and a video. Your Unity project folder should contain your Unity saved scenes and all your Scripts and Assets that will be required to rebuild your project. Please do not include your project executable in the folder.
You will also need to upload a video recording of your application. To do that, turn on screen capture on your phone and run the application. Interact with your application and make sure you show all aspects of the assignment: head rotation, gaze, teleportation, movements, day/night mode, and all required VR objects for this scene.
For your report, you should include at least the following:
- A title: “CSE 566 Virtual Reality, Spring 2026, Assignment 1: Basic VR”
- Your name and Stony Brook ID
- Any extra functionalities/ features that you implemented for this assignment
- Details on implementation: references to the downloaded 3D models or how you designed your own model; how the motion paths in your scene were implemented; how the lights and shadows in your scene were implemented; how the scene transition was implemented for switching between the modes, to mention but a few.
Extra credit of up to additional 10% of the assignment value in the final grade will be given to extra functionalities and/or features that you implemented for this assignment, including particularly detailed building models. Please describe the extra functionalities and/or features in your report.