Complete the following 5 questions. Be sure to write your name at the top of all source files you edit. Note that it is best if you work on the questions you are most familiar with first so that you do not get stuck on one question for a long period of time. Please sit in your assigned seat. You'll have 2 1/2 hours to complete the exam's 5 questions.
Note that you will be permitted select sites on the Internet during the exam. You are not permitted to communicate with anyone during the exam, whether via email, texts, IMs, or message boards. Note that all Internet activity is being monitored and recorded during the exam, so please be sure to follow the rules laid out here. The following are the sites you are permitted to visit:
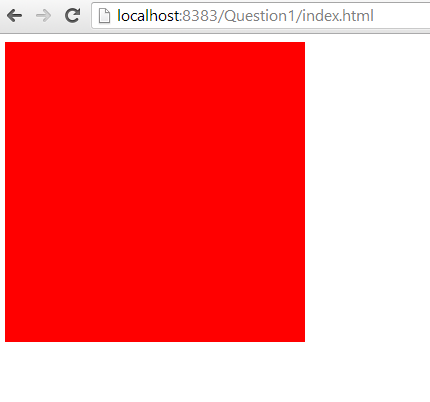
The Question1 project contains an HTML file and a JavaScript file. Add the necessary code such that when the page loads, a filled red square alternately grows and shrinks continuously from a square with a length of 0 up to the length of the canvas itself. Note that if we were to change the dimensions of the canvas to a different sized square, it should still max out at that size. Your demo should use a frame rate of 50 Frames Per Second. Note that you may only use HTML and JavaScript in your solution.
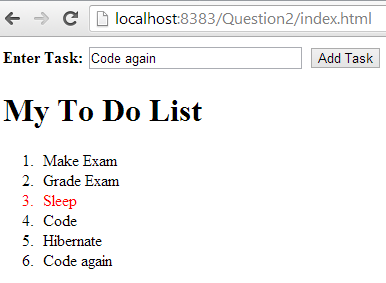
The Question2 project contains an HTML file and two JavaScript files, one being jQuery. Add the necessary code such the user may type in a task into the text field and press the Add Task button, which will add the typed task to the ordered todo list. Note that you should use jQuery to do so. In addition, should the user click on one of the tasks in the list, it should turn red, while all other tasks in the list should be rendered in black. Again, you should make use of jQuery to accomplish this.
The Question3 project contains an HTML file and two JavaScript files, one for a Node.js client and one for a server. Add the necessary code such that the user may type in a name and message into the provided text fields and that message will then be displayed inside the chat_room_log table for all connected clients. Note that in the table, the user name should be in the left column, while the message is in the right. Also note that the user name should be colored blue in bold face type. Finally, note that pressing the Clear button should clear all messages in the table for all users. Note the demo below which shows users (Jack and Jill) chatting in two different browsers.

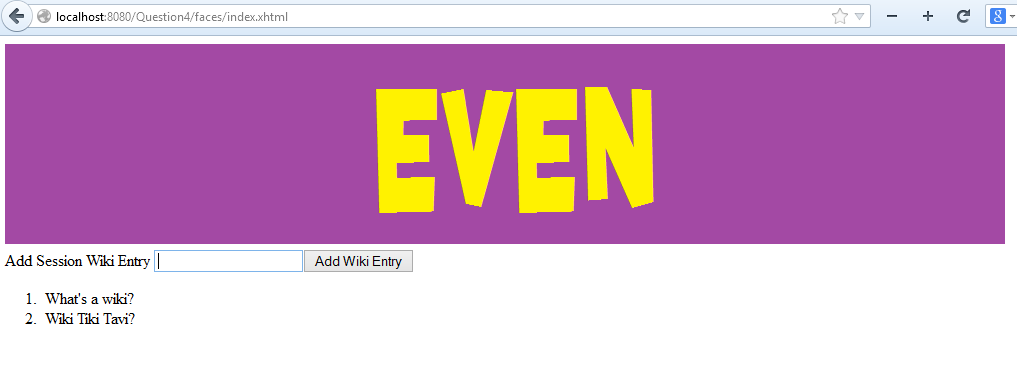
The Question4 project contains a JavaEE Web Application that employs use of JSF and a managed session bean but no database. Add the necessary code such that the user may add text into the text field and press the Add Wiki Entry button, which should then add a numbered entry to the wiki display. Note that this must be done through the bean, not client-side JavaScript. Also note that when there are an even number of messages the banner image should read Even, and when there are an odd number of messages the banner image should read Odd. The images below demonstrate both states.

The Question5 project contains a JavaEE Web Application that employs use of JSF, a managed session bean, and a Derby database. Note that before getting started on this question, all students must first do the following setup:
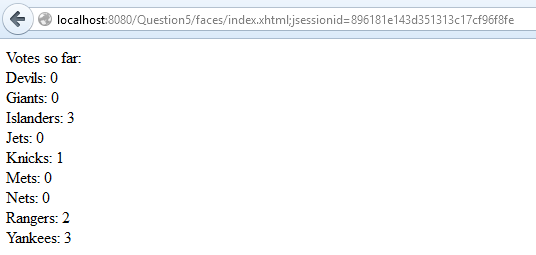
Now if you look at the project you should find the Facelet, the bean, and an entity class, which is all you should need for this question. Add code such that the user is asked to choose their favorite of the 9 NY Metro Area professional sports teams. The page should have a button for each one. Should the user press one, it should tally a vote for that team, which should be stored permanently in the database. Note that the database would be shared by all users. Note that once the user has voted during a session (which has been set to 1 minute without interaction), the user should only the voting results so far. The image below displays the initial UI presented to the user when a session starts, providing the voting options.

Once a vote has been cast during a session, the results screen is displayed, as shown below.
When you completed all of your work, zip up the directory containing all the projects into a ZIP file named LastNameFirstNameFinal.zip, where you put your last and first names in the file name. Then open a browser window and go to Blackboard to submit.