CSE 566 Virtual
Reality
Spring 2026
Prof. Arie
Kaufman
Assignment 0:
Introduction to Unity
Credit: 1% of
final grade
Due date: Friday, February 6, 2026, 11:59 p.m. (Stony Brook
Time)
Unity is a cross-platform game development engine for 3D games and 2D games, as well as for virtual reality and augmented reality. In this course, you will design and develop your assignments in Unity.
For a true VR experience, we strongly recommend that you meet the following minimum hardware requirements:
● A Google Cardboard (or similar)
● A mobile device with either Android version 8.0 or
higher or iOS version 12.0 or higher (note that for later assignments you might
need a higher version of the OS).
1. Installation
and getting started
(1) If you are a beginner in Unity, it is strongly recommended to check out the Unity manual (Chapter Unity for first-time users) to get started. (Must-read chapters: Getting Started, Key Concepts, Asset Workflow, The Editor Interface)
(2) Installation recommendation:
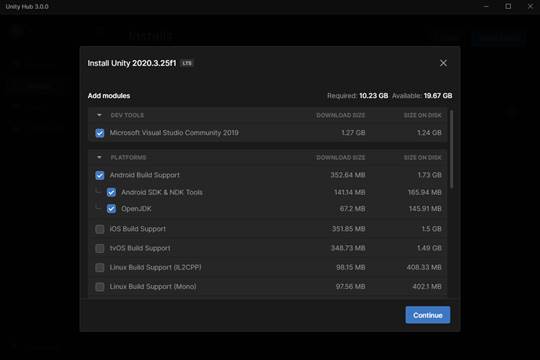
We suggest that you install the recommended Long Term Support version: LTS Release 6000.0.62f1 via Unity Hub. You may need to install Unity Hub first, and download the recommended version of Unity. During installation, you will have to create an account with Unity. Since you will be required to deploy your projects on a mobile device, depending on the mobile platform you plan to use (iOS or Android), please make sure “Android Build Support” or “iOS Build Support” and its SDK/NDK/JDK (Only if Android) are marked as installation components during installation, as shown in Figure 1. Also, it is recommended to install the suggested Visual Studio during the Unity installation.
(3) Mobile development build configuration:
When you are deploying your application on Android, or iOS platform, you need to configure the necessary development settings.
● Unity development environment settings for Android can be found here (Check the tree hierarchy on the left in the linked page).
● Unity development environment settings for iOS can be found here (Check the tree hierarchy on the left in the linked page).
● Google Cardboard for Unity. Please follow the instructions on this link to download Cardboard SDK for Unity and configure settings. Relevant sample projects and API guides are also provided in Google Developers and Google VR Cardboard XR Plugin GitHub page.
|
|
|
Figure 1. Installing Unity with necessary packages for mobile development (Android). |
2. Working with Unity
(1) Programming language: It is suggested that you work in Unity with C#. It is possible to develop your project with C/C++ (Using Native plug-ins), but some functionalities may lack support, thus, you need a special instructor permission for that.
(2) Project backup: It is suggested that you update your assignments in Unity Cloud Storage. This is also helpful for backup.
3. Beginner tutorial links
The following tutorials can help you to have a jump-start:
● Unity official tutorials for beginners
● A good tutorial blog (you can find more in this blog)
4. Some
tips for working with Unity
● You can find shortcuts and hotkeys in Unity from the Main Windows.
● To estimate the performance (e.g., Framerate) of your application, you can simply enable Stats in Game view, as shown in Figure 2.
|
|
|
Figure 2. Stats tab checked within the Game tab in Unity. |

The more detailed analysis of project performance can be found in Profiler; you will find it very useful when you encounter unexpected drops (e.g., Frame rate drop) in runtime (Check this manual).
● Debug and Console Window
The Console Window can display plenty of useful information (Check this manual). It is worth noting that there are several buttons on the top of Console Window, as shown in Figure 3. Please try these buttons yourself in order to see how they can help you.
|
|
|
Figure 3. Console tab in Unity. |

To aid with debugging, you can show your own messages in the Console using the Debug.Log, Debug.LogWarning, and Debug.LogError functions. To learn more about Unity log files, please check this manual.
● Search assets for your projects
In each assignment instruction, you will be provided with recommendations of assets (including models, textures, materials, and external packages). Most of the time the recommended assets are available in the Unity Asset Store for free. However, these assets are not mandatory - we encourage you to use your favorite assets as long as your work achieves the requirement in the instructions, the assets are not copyrighted and you use these assets legally.
5. Assignment tasks
(1) Creating “gameobjects”: In Unity, a virtual object that exists inside the game space is called “GameObject.” Gameobjects can be hierarchically structured or contain other components as well. The components range from Unity’s built-in components (e.g., Mesh, Physics Colliders, etc.) to custom-defined scripts (Pieces of code that modify the properties of a gameobject).
Now, let’s create our first gameobject. Make four 3D game objects in your virtual space and have three of them be the child of one gameobject. The advantage of forming a hierarchy among game objects is that it increases your controllability of multiple game objects at once. Once you move the parent gameobject, the engine automatically takes account of the concept of relative spacing, and its children follow along. The 3D game objects do not have to be complex or fancy in this assignment. It could be any 3D primitives (e.g., Cubes, Spheres). For future assignments, you may include more sophisticated looking 3D objects by downloading from an external source and importing it into your scene, or using Blender to design it yourself.
(2) Changing the textures: All visible 3D objects in Unity contain one or more Material(s). This enables you to not only see a gameobject in your game, but also enables you to manipulate the behavior of how your game engine should render the gameobject. In other words, if you can see a 3D game object in your scene, it means your game object already has a Material attached to it. You can have a gameobject with multiple materials, but we advise you to start with a single material gameobject. Create four different materials with different textures (or same texture with different colors) and assign them to each 3D object you have created in Task (1). If you imported your models from an external source, please study how they added the materials, and try creating the materials yourself.
|
|
|
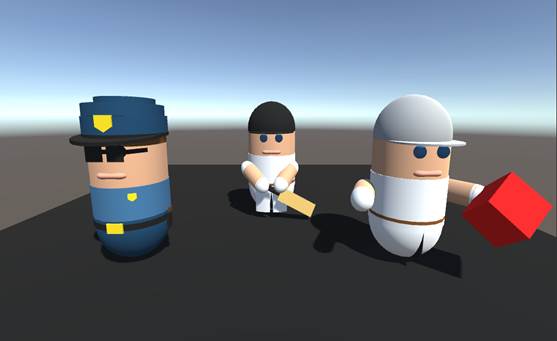
Figure 4. Potential look of the task (3D models imported from Easy Primitive People). |
6. Live help session for Unity
TAs will hold a tutorial/help session for Unity on Jan. 28 during the regular course hours. We will be covering from how to install Unity and its required packages to creating a simple sample project. Please do not miss attending the session if you are having difficulty in Unity.
7. Submission
It is strongly recommended that you test your application before submitting your work. Please save your Unity project in a folder named “CSE566 Assignments” in Google Drive, after zipping it, and enable the share of this folder rather than sharing the single project file. In Brightspace, please submit the link to your Google Drive folder.
For this assignment, include the following for full credit: your Unity project folder, a report, and a demo video. Your Unity project folder should contain your saved Unity scene and all your Scripts and Assets that will be required to rebuild your project. Please do NOT include your project executable in the folder.
You will also need to upload a recording of your application. To do that, build your application on your PC, turn on the screen record on your PC, execute the application, and save the demo video as mp4 format. Make sure you show all aspects of the assignment: All required virtual objects in the scene.
For your report, you should include at least the following:
- A title: “CSE 566 Virtual Reality, Spring 2026, Assignment 0: Intro to Unity”
- Your name and Stony Brook ID
- Any extra functionalities/features that you implemented for this assignment
- Details on implementation: references to the downloaded 3D models or how did you design your own model, etc.